Dateline: 11 October 2006
Updated: 10 April 2013
Updated: 10 April 2013
Columbus Day, the second Monday in October, is the traditional target date for planting garlic here in the northeastern United States. The objective is to get your cloves in the earth so they have time to put down roots (but not much topgrowth) before winter dormancy sets in. Then, first thing in the spring, often with snow still on the ground, vibrant green shoots emerge with their promise—spring is about to arrive; tulips and daffodils will follow. Garlic knows.
In past years I have planted my garlic as late as the second week of November and it still turned out just fine. But November-cold ground pulls the heat out of your fingers as you work, leaving them stiff and aching. Things are not usually much better above ground in November. Such weather takes the pleasure out of planting and that is a shame. Planting should be a joyful process, even if it is work. This year I had an absolutely perfect day for planting.
I walked out of my house that morning and, like every good agrarian, paused for a visual drink of earth and sky. There was a chill in the air but the sun was coming up strong and confident. The proverbial frost on my deck pumpkins was just starting to melt. A fading-white, spectral moon hung in the clear blue northern sky. Only hours before, that moon had been so full-orbed and golden in the blackness—a quintessential harvest moon.
Yes, it would be a glorious autumn day in which to plant 1,200 cloves of German Allium sativum. That is my usual planting. It is not a lot but it is as much as I can properly care for as a part time garlic farmer. Next August I will harvest enough bulbs to make around 1,000 ounces of gourmet stiffneck garlic powder. After setting aside for my family’s needs, every granule of the wholesome, flavorful powder will be sold, typically within a couple of months. And I’ll use a portion of my bulb harvest as seed for the next year. Sustainability is a beautiful thing.
The evening before planting day, I spent a couple hours in my shop, carefully pulling the bulbs apart. I set the largest cloves aside for planting. The smaller cloves went into a different pile. They will be peeled, sliced, dried and ground into powder. Cloves with even a hint of mold or spoilage were thrown away. Blemished cloves render sick plants. And only the best cloves make the best powder.
Two days before my day of planting, the 20 ft by 50 ft patch of ground I had selected for growing the garlic in was covered with a dense, lush stand of green buckwheat. I planted the fast-growing, weed-choking grain about a month ago. Prior to that, the ground had been an old hay field, untended for many years. It is my neighbor’s field. He graciously allows me use of it. I pay him with garlic powder.
I mowed the buckwheat down with my push lawnmower. Then I chopped it up and tilled it under with a couple passes of my rototiller. The next day I tilled the ground again, leaving it soft and unmarked by any footprints—a perfect planting bed.
I have planted my garlic in garden beds and I have planted it in single rows but my favorite way to plant is in wide-rows. The beauty of a wide-row is that the plants, once they are grown act as a “living mulch,“ holding moisture in and depriving the underlying weeds of nourishing sunlight.
I have written about my wide bed planting approach in the book, Making Great Garlic Powder: Homegrown And Homemade Secrets From A Garlic Powder Guru. What follows is a quote from the book. Pictures to illustrate then follow:
”I admit to being a little obsessive about how I plant my garlic. Not only do I want the garlic bulbs to grow well, I want them to be visually pleasing in their arrangement. That means I plant my garlic intensively (close together) in wide rows and space the bulbs with geometric precision. You can do this too, if you like, without a lot of trouble, by following my simple planting system. I’ve used this system to plant several thousand garlic bulbs, but it will work just fine for a small planting too. An alternate planting approach is to just space your bulbs by eye in a bed—they won’t mind a bit if they aren’t perfectly aligned, and they’ll taste just the same too.
I start with a tilled-up section of garden space. Then I measure and drive a stake to mark the centerline of each wide-row bed I want to create.... The stakes are spaced [42 inches] apart. I string a line between two stakes, about one foot off the ground. The string serves to help me align my planting template.
The planting template is a piece of 1/8” Masonite (a.k.a. hardboard) twenty-four inches wide and eight feet long. Onto the template I have carefully marked out the bulb spacing I want in the bed. Seven-inch spacing in alternating rows of two and three bulbs results in forty garlic spaces in the template. Using a hole saw in a drill, I make a hole where I’ve marked for each garlic clove to be planted.
To use the template, lay it on the tilled ground and position it so the center holes line up directly under the string. I then mark each planting space by dusting some white powdered lime over the holes. That done, I pick the template up and move it down the row, repeating the process....
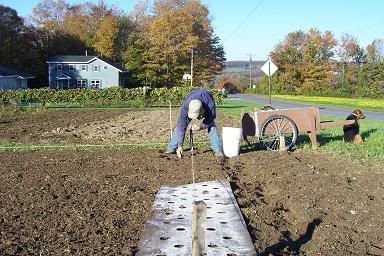
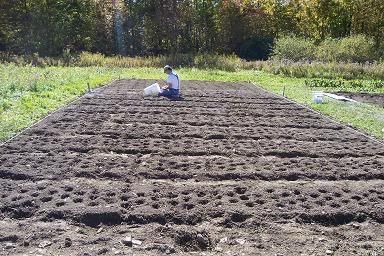
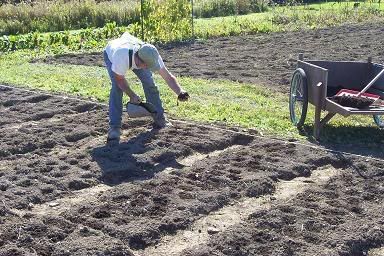
In the book there is an illustration of the template. This next picture shows the string line with the planting template centered underneath. At the other end of the row is yours truly planting garlic cloves (the cloves are in the white bucket). My incredibly handy homemade garden cart is clearly visible, as is my faithful dog, Annie. She likes to stay close by when I’m working in my garden. In the background is my home. The trees beyond are quickly approaching peak autumn color. The yellow and red leaves are just beginning to fall. I know that one good storm, with wind and rain, can strip most of the leaves away in a matter of hours, so I made a point that day to observe and appreciate the beauty around me.
And in so doing I saw my first-of-the-season V-formation of Canadian geese fly over. I stopped to count them. Twenty eight, heading southeast. By the way, you can see the nicely tilled ground in the left of the picture.
planting garlic 1:
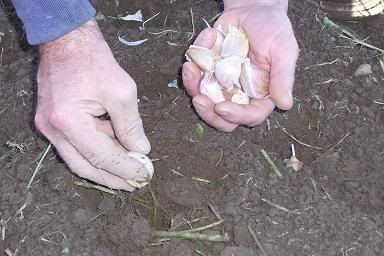
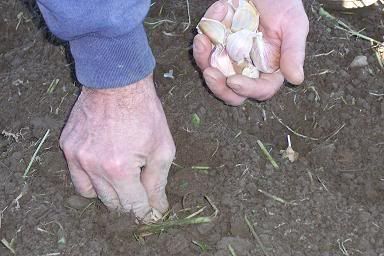
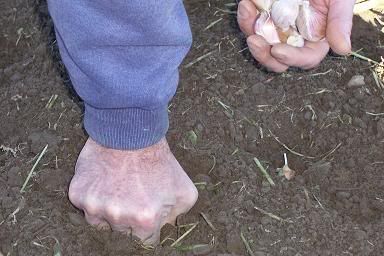
I plant German “stiffneck” garlic. It has large cloves arranged around the central stem. So each clove is triangular shaped in cross section, like the wedge-shaped slices of a pie. When planting, I cradle the clove with three fingers. My thumb is on the outside of the bulb (the crust edge of the pie piece) with my index and middle finger on the other sides, as shown in the next picture. the pointed tip of the clove is facing my palm. You want the pointed tip aiming up when planted. If you plant the clove upside down, the greens will emerge under the clove and have to fight their way upwards to the sun.
I plant by pushing my fingers into the earth until the bottom of the clove is seated down into a firm bed of soil. Around 3” deep is good, and that is about up to my knuckles—a little deeper than shown in the third photo below. Notice also in the right side of the pictures you can see the tip of a planted clove.
planting garlic 2:
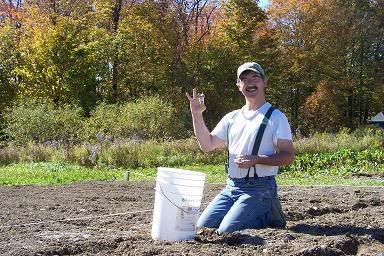
In this next picture you can see across several planted and cratered wide rows. Each 20-foot long wide-row contains 95 garlic cloves and there are thirteen rows.
And here (below) is a close up of me, taken by my son, Robert (who took most of the pictures in this essay). I’m enjoying myself. Planting garlic on a warm, sunny day in October beats working in a factory, which is what I do for a living. I actually got a bit of a sunburn that day.
If you are particularly observant, you will have noticed that in the first picture of me planting (when I was starting out) I am standing and bending over to place the cloves in their allotted positions. But in this later picture, I am planting on my knees beside the row. That bending over can be hard on a back!
After the planting is done, it’s time to cover the cloves and fertilize the crop. I do this all in one operation by putting a handful of compost on top of every “clove crater.” The next picture shows my compost pile, with son, James.
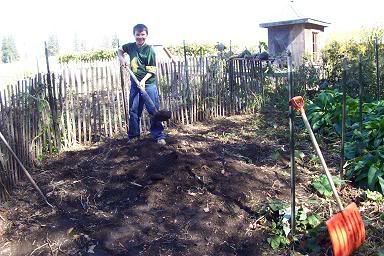
This compost pile is located adjacent to my chicken yard (the fence in the background). It is actuallypositioned right where last year’s chicken yard was. Some of the fence posts are still there and visible in the picture.
I build my compost pile by tossing all organic matter from my yard, garden, and kitchen into the chicken yard all summer long. The chickens scratch through and add their contributions. Then, in the fall, I fork the perimeter into the center and end up with a big heap. The pile in the picture has been rotting down, undisturbed for about a year. It is dark, crumbly, absolutely beautiful compost.
I usually sift my compost through a mechanical compost sifter that I invented. But I recently took the motor off to power an apple grinder (another invention I’m working on). So I didn’t sift the compost before putting it on my garlic. I just pulled out larger sticks and stones and bits of plastic baling twine, and I even found the good paring knife we lost last year. The resulting compost was almost like sifted, as you can see in the next photograph.
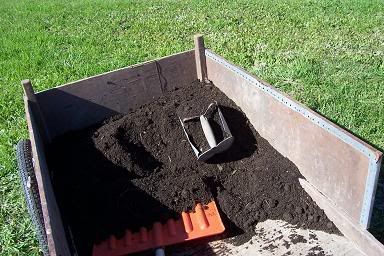
What you can’t see in the above photo is the dried blood meal I mixed into the compost with a hoe. Altogether I used a 50 pound bag of the dried blood powder to fertilize this year’s garlic. The blood is a slow-release organic source of nitrogen that the garlic will utilize to grow healthy, lush leaves in the spring.
This next picture shows me putting a liberal handful of compost onto each clove.
The final planting step is to cover the rows with a blanket of straw mulch. I don’t have a picture of that because I am publishing this essay two days after planting and I don’t yet have the straw to mulch with. But there is time yet to get that done before the snow and bitter cold of winter arrive. The hardest work of planting is done and it is always a good feeling when your crop is in the ground.
I hope you have enjoyed this introduction to how I plant my garlic. If you have any questions, feel free to ask them below.
===========
I invite you to read more of my garlic-related blog essays:
Making Pickled Garlic Scapes
Selling My Garlic Powder At The Farmer’s Market
Home-Based Agrarian Enterprises & Garlic Powder Profits
Curing Garlic Bulbs


.JPG)
.JPG)


.JPG)

.JPG)


.JPG)


20 comments:
Herrick,
Do you have trouble with chickens scratching the garlic out of the ground? My chickens tend to rush to recently tilled ground in search eatables so I am afraid they will make a mess of my garlic as soon as I plant it.
Thank you so much! Really enjoyed this. I want to do more garlic...just for th e family. Yes, I am inspired.
Hannah
Herrick, that's quite an amazing garlic crop you have! I was thinking I'd experiment with a couple different varieties this year. I've never planted garlic before and was nervous about it, but now I feel completely confident, having "watched" you plant yours. Thanks so much!
Justin-
Chickens can be such a nuisance. I keep my egg layers penned for the growing season so they don't ruin my garden. Just this week I opened their pen so they can range and scavenge what they can find. My garlic bed is far enough away that they have not yet gotten to it.
anonymous and melody-
I'm delighted to know that you are now inspired to plant garlic. You'll be avid and experienced garlic growers in no time! Thanks for stopping by.
Herrick....what size of holes did you drill in the garlic planting templates?
I think they are 2". Anywhere around that size will do the job.
We're in KY and wondering if it's too late to plant garlic. We just finished some raised beds and thought we might try some in there. Could you recommend anywhere we might could get some at this late date?
Thanks,
Allen
P.S. Really enjoy your blog and plan to start building my scalder and plucker (according to your plans) after the first of the year.
I just came across your essay on planting garlic. I laughing out loud when I came to the way you use a templet to plant your garlic, I also made my own templet this year. A 4 inch x 4 foot board
with 2 inch circles about 3 inches apart. I fill each hole then flip it over to the next row to get perfect spacing. Also I sift my compost too. My compost is also made up of chicken manure and every bit of our kitchen scraps. I am looking into purchasing an acre of land this year to grow more then the 120 cloves I've planted this year. Do you know how much garlig you can grow on an acre; just over 46,000 heads now thats a lot of garlic. Enjoyed reading your writings. I will be ordering your book on making garlic power and will let you know how I make out. Jerry pa.
Herrick,
We have been inspired to plant garlic. It is done, although it was JUST done (a little late, but I think I made it).
Anyway, I planted them so that the tips were even with the ground level, then I pulled dirt over them to about three inches, leveling it into a nice raised bed. Then I mowed the yard and put 4-5 inches of grass clippings/leaves over that (no available compost). Then I put a couple of inches of straw over that. Does that sound right? I am thinking that it just about can't be too thick, because it will sink considerably during the winter. Am I right?
Also, I planted some three inches apart and some six inches apart. I meant to do them all six inches apart, but I don't have a template, I just eye-balled it.
Please let me know what I did right or wrong.
Thanks. :-D
Ron & Ginny--
Congrats on getting your first garlic crop in the ground. I've never used grass clippings for mulch. They tend to pack down quite tight but I don't think that will be a problem. The three inch clove spacing is a bit close but you did right by getting it in the ground and your garlic will grow just fine.
Perhaps you can post back here with the final results of your first crop next year. This is an old posting but a lot of people come here and read this. Best wishes--Herrick
Thanks, Herrick. Yes, I will let you know how it goes. :-D Regarding grass clippings as mulch, I have used it for about four years now, in the garden, and I love it! It packs down, but it has never hindered anything that I know of. In fact, I can't get all the garden mulched at one time and you can certainly tell the ones that have been mulched for a longer time. They are bigger, healthier, greener, etc. I usually mulch after putting in plants or, if I direct-seed, after the seedlings are about six inches tall. Then I put about four inches of grass clippings around the plants. I have never noticed any plants having any problems because the mulch is right up to the stem or anything. Never noticed any rodent activity that would bother me. I am perfectly happy to share with wildlife, within reason. ;-) I just think grass clippings and leaves are the best, because they are free for the taking, and they are easy for me with my lawn tractor and bagger, and wherever I put mulch I have NO weeds. Anyway, sorry for the long, irrelevant post. Thanks for your reply. :-D
Greetings!
It is spring, praise the Lord! And I am wondering when I should pull the mulch off the garlic. Or do I do that at all? Or maybe, at some time, just loosen it down around the stalks that come up? I have not done anything to it since I planted it. I am DYING to know what is going on under all that mulch! LOL!
Thanks.
I am wondering how well garlic transplants. Inevitably I miss some garlic in the harvesting and it grows up everywhere in the garden. Since I hate wasting anything I am wondering if you can transplant it similar to onion transplants.
Jan
Very interesting article! I love cooking with fresh garlic and due to rising food costs I am looking into growing as much of my own food as possible. But with bad knees and fibromyalgia, I cannot do typical gardening. How well does garlic grow in containers?
Wow! I ran into your posts today on how to butcher a chicken. I love your contributions to your posts. Thanks for all your ideas and pictures.
I was wondering how much the soil conditions matter. First, I am in Oregon so I will need to research that, but we live in a town home and have small areas in the back and front I would like to use for gardening. The ground is pretty hard I was thinking of mixing some softer soil in with fertilizer. Does garlic grow fairly easy?
Thanks for any advice!
Mr and Mrs Vallely
I've read your articles on growing garlic several times but didn't act on them. A friend gave me 38 cloves of german stiffneck and I just had to plant them. I planted in mid-October and now, it's April and I have waste-high plants (I'm only 5'-7" but still!!)
Reading about someones life is good, but living our own is even better. Thanks for sharing your eperiences so that I can add one more experience to my own.
I have been growing both hard and soft neck garlic for a while and employ mulch often in my garden ala Ruth Stout but I am always trying to improve my technique.When you mulch with straw how deep? Does the garlic emerge before winter? Do you have to re-apply mulch in the spring to beat the weed growth? Or given the amount of straw you apply does the garlic shade out the weeds? Thank You.
Any suggestions for gofers? I live in NW Colorado and am just getting ready to plant as we will probably have snow at the end of October or first of November. Anywho we have a terrible problem with gofers! I hope they dont peak up and steal all the bulbs. I heard adding the blood meal might make them want to take them more as they would be attracted easier.
I just planted about 50 cloves of garlic on the full moon of Oct. 2011. I live 60 miles north of San Francisco, CA. Weather has been 68-75 degrees with cool (45-50degree) evenings. My "Susanville" garlic is already emerging. This is my first venture with garlic and thought it would not show growth until after the winter. thanks for any imput =D
Herrick: I absolutely loved reading about how you plant, harvest and market your garlic. I have been growing garlic for about 7 years with great results. I use a lot of tricks similar to yours. I have been having troubles with white rot. This is a fungus that attacks the allium family. Do you ever have trouble with that? Any suggestions?
Post a Comment