My Chicken Plucker
Parts Business

Dateline: 26 September 2006

Shortly after writing the plucker planbook, Anyone Can Build A Tub-Style Mechanical Chicken Plucker, it occurred to me that I could supply people who wanted to build their own Whizbang Plucker with some of the harder-to-find parts needed to get the job done. Thus began a small home industry. In this blog entry I’m going to show you inside my Whizbang plucker parts manufacturing facility, introduce you to my key employees, and tell you about each of the plucker parts I sell.

The primary plucker component I make and sell is called a featherplate. The featherplate is a round disc positioned at the bottom of the plucker. It is studded with lots of rubber plucker fingers and spins around. When a scalded bird is dropped into the plucker it tumbles around and the fingers flail the feathers off. It’s really quite amazing.

My plucker planbook tells you exactly how to make a featherplate. People have made plates out of plywood, solid oak boards glued together, and even recycled aluminum stop signs. The featherplates I make and sell are made out of very durable 3/4” thick High Density Polyethylene (HDPE).

The following picture is of one of my key employees. His name is James. He is my 11-year-old son. I buy 10 sheets of plastic at a time and have it shipped to New Hope Mills in Auburn, N.Y. I do that because the Whizbang plucker parts manufacturing facility does not have a dock where tractor trailer trucks can make deliveries.


James and I load the heavy sheets of plastic onto my little trailer and bring them to our manufacturing facility, which happens to be located next to our house on our little homestead out in the countryside here in the beautiful Finger Lakes region of upstate New York. Ten sheets of HDPE will make 80 featherplates.

When we get the plastic home, we cut it into 2-foot by 2-foot squares with a saw and stack them in the factory. Each plate then goes through a carefull 11-step manufacturing process before it is done. My other key employee is my 15-year-old son, Robert. Last summer I walked into our factory and took the following picture of a very diligent Robert drilling finger holes in one of many featherplates.


As you can see the Whizbang manufacturing facility is just a small and very crowded workshop. But it is still a serious shop—-my sons and I produce carefully-crafted featherplates. Here’s another view of the shop and Robert. Notice that he is sitting on a plastic lunch box which is on top of a stool. We’re great improvisers around here.


After a featherplate is machine-rounded (to 20-3/4”) and drilled, I precisely position and mount a sturdy 1” diameter flanged drive shaft directly in the center of the plate. And I also mount a reinforcing plate on the bottom of the featherplate. The HDPE is stiff and tough and probably doesn’t need a support plate but I tend to overbuild. It makes me feel like I’m giving people a better product, and I am. This next picture shows a completed featherplate with attached shaft.


The plucker fingers I recommend in my book are designed to grip a thinner plate so, as you can see, each finger hole is countersunk on the bottom of the plate. This next picture shows a top view of the finished plate.


I also sell a 16” pulley, which attaches to the bottom of the driveshaft. The pulleys I sell are flywheel-heavy and they're ideal for the "driven" pulley on the bottom of the Whizbang Plucker.


An idler arm is needed to put pressure on the drive belt that runs the plucker. I tell how to make and install the arm in my book, and I sell an idler arm hardware kit as shown in the next photo.


Those four items—the featherplate, the flanged shaft, the 15” pulley, and the idler arm hardware kit are the harder-to-find plucker parts I sell. But I guess they aren’t really all that hard to find because they are available from me! ;-)

When someone purchases any of my plucker parts, I also send along some unique free things, as shown in this next photo...


The Euro-style oval sticker on the top clearly identifies you as a member of the Fraternal Order of Whizbang Pluckerbuilders, otherwise known by the acronym, FOWP. Whizbang pluckerbuilders are an exclusive group of very special people and I felt that we needed to identify ourselves as such. So I display a FOWP sticker on my vehicle and I look forward to the day when I see another vehicle with a FOWP sticker. It hasn’t happened yet, but when it does, I’ll know I’ve found a friend.

The yellow safety sticker in the middle of the picture will fit nicely on the 2x4 rails of your plucker. These stickers are available to anyone at the very reasonable price of $2.00 for one or $3.00 for two (postage paid). I encourage everyone with a Whizbang-inspired plucker to get these labels (even if you didn’t get parts from me) and put them on your unit, especially if you loan it out to others.

The nifty green and white bumper sticker says “Ask Me About My Whizbang Chicken Plucker.” It’s a real attention getter and conversation starter. And it’ll look right fine on the bumper of your town car.

All the stickers are made of the finest UV and weather resistant vinyl.

If you’ve read the Whizbang Plucker planbook, all of what I’ve told you will make more sense than if you haven’t. In any event, I hope you’ve enjoyed learning about my little home business. Someday, somehow, I’d like to expand this little example of a fledgling home economy. I love to have my kids work with me and I’m including them in the business as their maturity and skills allow.

UPDATE: June 2017
It has been 11 years since I posted this essay and we're still selling parts for people to make their own Whizbang poultry plucker. Some of the information above is outdated. You can now get complete, up-to-date information about the Plucker parts we sell (and order with a click of your mouse) by going to this link: Anyone Can Build A Whizbang Chicken Plucker

###

If you have not already done so, I invite you to read the following poultry-related stories that I’ve written:

The Best Place to Buy Plucker Fingers

My Whizbang Plucker Story

Frequently Asked Questions About The Whizbang Plucker

Introducing My Deluxe Homemade Chicken Scalder

Backyard Poultry Processing With My 11-year-Old Son

Talkin’ Bout My Chicken Tractors

Talkin' Bout My Chicken Tractor (Part 2)

How To Butcher A Chicken

Getting Started With Turkeys

Turkeys in Tractors & Comfrey For Feed

FREE Chicken Feed

The Whizbang Plucker Story

Dateline: 20 September 2006

I’ve been blogging here for over a year now and, though it has been mentioned, I have never dedicated an entire blog entry to telling you all about the chicken plucker I developed and the plucker planbook I wrote. So I guess it’s about time, especially since I’ve finally figured out how to take and post pictures to the internet. Let me begin with the end product. This next picture shows me with a couple of defeathered fowls fresh from the plucker...


This next picture shows me again. This time I’m carrying two just-scalded birds to the plucker. That tub-plucker is the original Whizbang. It is 5 years old. I’ve used it many times and I’ve loaned it to friends many times and it works as good as the day I made it.


And this next picture shows two birds in the tub, right after plucking. Notice the many black rubber fingers. They do the work of picking the feathers off the birds so you don’t have to. There is a round plate (the “featherplate”) at the bottom of the tub that spins around and tumbles the birds.


Now, without further ado, I’ll tell you the Whizbang story.....

The Ecstasy And The Agony 
Of Raising Meat Birds
Eight years ago my wife and I decided to try raising our own chickens on pasture. We were motivated to do this by a strong desire to have meat that was as healthful and flavorful as it could possibly be.

So I ordered 25 day-old Cornish meat birds from a hatchery. We raised those cute little chicks into  not-so-cute, but wonderfully plump, broilers. We found that being small-scale chicken “farmers” was easy to do and a lot of fun. Then it came time to “process” the fatted fowls.

“Fun” is not a word I would use to describe that first experience of butchering poultry.

The worst part of it was, by far, hand-plucking all those steaming-wet, stinking feathers (after scalding the birds). Hand-plucking was messy. Hand-plucking was tedious. Hand-plucking was time consuming. Hand-plucking was, in short, nasty, discouraging work. There had to be a better way.

There Is A Better Way....
No sane person enjoys hand-plucking chickens. That being the case, machines have been developed to do the onerous task. There are currently two different types of plucking machines on the market.

One type of machine is the tabletop plucker. It consists of a rotating drum studded with rubber picker fingers. A flat table is positioned in front of the drum. To use a tabletop plucker, you hold your scalded bird up to the spinning fingers and manually move it around while the fingers flail the feathers off.

Once you become skilled at using a tabletop plucker, you can pluck one chicken about every 30 seconds. This is certainly an improvement over hand-plucking but there are several drawbacks to these machines. 1) You can only pluck one bird at a time 2) you still have to get your hands into the work 3) it takes practice to do a good and fast job 4) if you don’t hold onto your bird tight, the fingers will yank that critter right out of your hands.  

Here Is The Absolute Best Way 
To Pluck Chickens!
Tabletop pluckers are okay but they can’t begin to compare to tub-style pluckers. A tub plucker consists of a tub that you simply drop one or more scalded birds into. At the bottom of the tub is a round “featherplate,” studded with rubber plucker fingers. The plate spins, the birds tumble around. In about 15 seconds the chickens are bare naked and squeaky clean. That’s right, I said 15 seconds!

Nothing could be easier (and more fun) than dropping your scalded critters into a tub and watching the machine do all the dirty work. If you’ve never seen a tub plucker in action, this may all sound too good to be true. If that’s the case, let me take a moment to assure you that it is an absolute fact.

The secret to getting the best pick is to properly scald the birds. Once that is done (and it isn’t hard to do) the machine will remove virtually every feather, including pin feathers. There will usually be a couple odd stubs remaining, and maybe a large feather or two will be left on their tail or wing tips. Such feathers can be pulled right out in no time at all. The skin does not break when plucking (unless your scald is too hot) and bruising never occurs.

When I first saw a tub plucker in action, I couldn’t believe my eyes. I knew I had to have one.

The Only Problem With Tub Pluckers
Ready-made tub pluckers are expensive. The cheapest machine I could find at the time was around $2,000. That was a bit high for this thrifty, part-time chicken farmer to justify.

I Create The Whizbang Plucker
Necessity is the mother of invention. And so is poverty.  Having seen a tub-plucker up close and personal, I realized they are really very basic machines. In fact, they are so basic that I figured I could just make one myself and thereby save myself a bundle of money.

The plucker wasn’t quite as easy to develop as I thought it would be. I had to work several months building and refining my prototype plucker until it functioned like those expensive, already-made units. But when I was finished, the device worked so doggone good that I gave it a special name: The Whizbang Plucker. Whizbang is a dictionary word that means, conspicuous for speed, excellence, or startling effect. It is a perfectly appropriate name.

Better yet, I spent less than $500 on parts to build my Whizbang. That was using all new parts. If I had, for example, a used motor that would have worked, the final cost would have been less than $400.

But I Did Not Invent The Plucker
Some people mistakenly believe I invented the tub-style chicken plucker. What I actually did was figure out a simple design for making a sturdy and effective plucker using basic materials like 2x4 lumber and a recycled plastic 55 gallon drum. While a few other innovative backyard builders around the country had cobbled together their own homemade units, I was the first to come up with an attractive, standardized, easy-to-build plan.

Then I Write The Book
I figured there must be a lot of other people like me out there— people who needed a simple, inexpensive, yet well-built and effective, plucker.  So it was with that in mind that I wrote the Whizbang Plucker Planbook. It is officially titled, Anyone Can Build A Tub-Style Mechanical Chicken Plucker.  

The book is now in its fifth printing. It has 60 pages and 60 drawings. It tells you EVERYTHING you need to know to build your own Whizbang plucker. Everything.

Yes, You Can Build A Whizbang!!
You don’t need to be an engineer to understand my plans and put together your own Whizbang plucking machine. And you don’t have to be a welder or machinist either. If you have basic carpentry tools and skills, you can do it.

The book also provides you with information about where to get all the needed components for your plucker. Once you’ve rounded up all the parts, you should be able to have your Whizbang assembled and working in a weekend.

You’ll find the Whizbang is a dependable unit. And since it is so simple in design, very little can go wrong with it. But if, perchance, something does go wrong, you’ll be able to fix it because, after all, you will have built it!

If properly cared for, your Whizbang will dependably pluck thousands of birds for years to come. And it will pluck chickens for all your chicken farming friends and relatives too! Some people even rent their Whizbang pluckers out.

Chickens ... And Beyond!
The Whizbang Plucker will pluck turkeys, ducks and geese too. It will pluck turkeys almost as well as chickens. It does ducks fairly well. Geese are more of a challenge. But ducks and geese do not pick as well as chickens and turkeys in any mechanical plucker. This isn’t to say they don’t pluck well, they just don’t pluck AS well.

Welcome To 
The Whizbang Revolution
Homemade Whizbang Pluckers are now being used by backyard and small-farm poultry producers all across the United States. They are also in Europe, Asia, Africa, Australia, South America, and Canada. The planbook has been featured in BackHome magazine, Countryside magazine, Small Farm Today magazine, Mother Earth News, Farm Show, APPA GRIT!, NOFA NY, MOFGA, and several other publications.

The Yahoo discussion group, WhizbangChickenPluckers, has over 1,400 members. The group is free to join and, once there, you can see photos of several homemade whizbang-inspired pluckers from across the United States. You can also read A LOT of positive Whizbang feedback from readers and pluckerbuilders.  The ongoing discussion (and archived past discussion) is a rich resource of information on poultry processing in general and pluckermaking in particular. Here’s a link to the group.


Here’s What Some People Are Saying...

“Just a short note. I finally finished up our chicken plucker and on the 4th of July some friends came over to help us inaugurate it. We killed and scalded the first two birds, set them in the plucker, and I held my breath as I hit the switch. Total success! Feathers flying off, skin emerging. Fifteen to twenty seconds and we had naked birds ready to be eviscerated.

My friends, including a couple of engineers, were duly impressed. I (only half-jokingly) call it one of the Seven Mechanical Wonders of the World. Excellent design. Thanks for the hard work and clear writing and drawings in your book. We only did 8 or 9 birds that day, as the main purpose was celebration, but it took the time that one or two did in the old days.”

J. Dietzel
California

=====

“My Whizbang plucker processed 125 chickens this summer and I couldn’t be happier with the results.”

K. Jablinskey
Michigan

=====

“This is a very late thank you for your plans. I built your chicken plucker over a year ago and am very happy with it. I lend it out to several other backyarders and all really love it. The first time we turned it on we had three broilers in there and we started laughing so hard we couldn’t switch it off. It was the best chicken wrestling match we had ever seen. Think we could probably sell tickets. Does a great job and all the parts we purchased directly from you were excellent and saved us money too. Many thanks.”

C. Wilson
Connecticut

=====

“My plucker works just the way you said it would. It’s a real WHIZBANG!”

B. Rieger
Montana

=====

“We did 225 chickens, 55 ducks, and 12 turkeys this year. It wouldn’t have been possible if not for the Whizbang. THANKS!!!!!”

C. Ewer
Wisconsin

=====

“Whiz Bang Chicken Plucker became operational today. Fifteen seconds later I was looking at three six-pounders with no feathers. My hat is off to you sir.”

D.A. Boyle
(unknown location)

=====

“I just had to write to tell you that my plucker works great! The plucker was a project for my 12-year-old son to complete.... Thank you SO MUCH for writing this book! It was so much fun to read, but not half as much fun as it was watching the chickens getting plucked. Your book made a chore into a fun experience.

D. Hogan
(unknown location)

=====

The above unsolicited quotations are a very small sampling of the MANY positive responses I’ve received from people who have used the Whizbang planbook to build their own plucker.

Here’s How To Buy A Copy Of The Book
The Whizbang Plucker Planbook is available from the following places...

Whizbang Books
Cumberland Books
BackHome magazine
Murray McMurray Hatchery
Stromberg’s Hatchery
Back 40 Books
Meyer Hatchery
Mother Earth News

==========

P.S. If you have not yet read the following poultry-related essays, I invite you to do so:

Frequently Asked Questions About The Whizbang Plucker

The Best Place to Buy Plucker Fingers

Introducing My Deluxe Homemade Chicken Scalder

Backyard Poultry Processing With My 11-year-Old Son

My Chicken Plucker Parts Business

How To Butcher A Chicken

Getting Started With Turkeys

Turkeys in Tractors & Comfrey For Feed

Talkin’ Bout My Chicken Tractors

Talkin' Bout My Chicken Tractor (Part 2)

FREE Chicken Feed
Dried Beans, Blogomercials, And More....

Dried Beans
Last spring I bought a small packet of four different bean seeds from Seed Saver’s Exchange and planted them in my garden. They are dried bean varieties and my intention is to replant the beans from this year’s small harvest next spring. I hope to do this until I have enough seed to plant a small crop. Then I’ll be able to harvest the crop and continue to provide my own seed, as well as seed to others. All of this can result from a single packet of seed.

My plan is to sell the dried beans but also to develop several dried bean and chili mixes using my homegrown stiffneck garlic powder as an ingredient. And I’d like to grow any other ingredients I can. I’m not much of a cook but I’m hoping to collaborate with a good cook (my wife) and learn a lot about bean soups this winter as we develop some mixes.

Treadle Bean Sorter
My county has a nice little agricultural museum. One of the items on display is a treadle (foot powered) bean sorter. Next time I’m there I’ll take a picture to show you what an old bean sorter looks like. I’m hoping to purchase one but they are hard to find. I’ve never seen one on Ebay but I don’t look all the time. I’m thinking of placing a WANTED add in the local newspaper. I suspect there are still-good bean sorters gathering dust in some old barns somewhere around here.

Finding A Broadax
My son James, the hopeful log hewer, bought himself an adz last summer. Then David Taylor very graciously sent him two nice log dogs. The one, most-necessary tool remaining to get is a broadax with an offset handle. We’ve been looking and not finding them. Brand new ones are quite expensive.

Well, James did finally find two broadaxes at a flea market a few weeks ago. He deliberated at length about which one to get and decided on the older hand-forged model (complete with handle). Then he talked the vendor down to $25.

I wasn’t there but Marlene said the man selling the axes was amazed that James knew what the axes were for and, even more, that he intended to use one to actually hew logs. In the end, he threw in a couple of old leg traps for free.

I have sent off for a log-hewing book that Dave Taylor recommends (James’s birthday is next month). Then I guess we’ll have to find us some logs to hew.

Another Farm Gone
One of my small-scale dairy farming neighbors is throwing in the towel. The man is around 60 years old. He grew up on the farm and has been a good dairy man all his life. But small dairy farms operated in a conventional manner simply do not pay any more. It’s sad to see any farm go out of business, but it’s especially sad to see a neighbor who loves to farm have to give it up because of the economics.

Land
How much is land selling for around you? The dairy farmer I just mentioned is selling a 78 acre lot just around the corner from me. 400 foot of road frontage on a paved county road. An abandoned town road (dirt) borders one side (would make a fine driveway). Gentle southwestern slope. Good soil. 35 acres is hardwood forest (recently logged). The rest is field (hay and corn on it now). It’s a nice piece of property. Asking Price: $89,000, So close, yet so far away.

Only a few years ago, decent farmland was selling around me for $500 an acre. Woodland was even less.

My Blogging “Infomercials”
The previous blog about my Whizbang Chicken Scalder was something akin to an infomercial. Maybe it could be called a Blogomercial. Whatever the case, I want to warn you that a few more such blog entries will be posted here very shortly. One will be all about my Whizbang Chicken Plucker, one will discuss the plucker parts I make and sell, and another will tell about “the next best thing to a Whizbang Plucker.” Oh, and I’ll probably post a blog about the how & why of making great garlic powder

I am posting such blogs here because it is an excellent way to tell people about the books I’ve written and the products I sell—not just for the few days it is posted but for a long time to come. Once posted, I can provide a link to people looking for the information. I can do this through various forms of marketing, including a future web site, e-mail information requests I get from people, and the test display ads I plan to put in a few select publications this winter.

So please bear with me and understand that I’m not going totally commercial here, though it may look like it for a few posts. I will return to the regularly scheduled blogging.

Amish Paradox
Would you think it strange if you saw a white limousine pull up and a plain-clothed, bearded Amish man with a straw hat got out? That’s what my son told me happened at the lumberyard where he works. The Amish have moved into our area in recent years and when they need to get somewhere further or quicker than their horse & buggy will take them, they hire a local non-Amish driver. One of those driver’s around here has a limo. I wish I had a picture of that to show you.

Farm Market Update
Next week will be the last farm market of the season for Marlene and James. After a slow start in the spring, they have had a great year at the market. Then I can take the extra gas stove out of our living room and store it in my shop until next year. Two ovens are very handy when you’re making a LOT of homemade bread in one day.

Uncooked Sweet Corn
Today we had corn on the cob with our lunch. I sat next to Robert on the stoop as he shucked it. I decided to eat an uncooked cob. I’m sure I’ve done this before but I don’t recall when. The corn was very sweet and good and it made me wonder.... Why do we cook sweet corn? Cooking destroys the enzymes that are so important for health. Most all vegetables are far, far better for us if eaten uncooked. I think I shall make it a habit to eat my sweet corn uncooked from now on, at least some of it.

Yes, I know, you can’t butter an uncooked cob of corn. So I guess that’s one drawback. Which brings me to a little tip I’d like to pass along. Homemade garlic powder, shaken onto hot, buttered, sweet corn is awesome—you must try it someday.

Mangle Beet Update
That mangle beet seed (from Heirloom Acres) that David Taylor sent me last spring is doing well. Here’s a current photo.....

Photobucket - Video and Image Hosting

P.S. I have been listening to the Entrapreneurial Bootcamp CDs from Vision Forum Ministries and still intend to blog about them here in the future.

Introducing
My Deluxe
Automatic Chicken Scalder

Dateline: 20 September 2006

 Bug-eyed scalder inventor and waving chicken

Backyard and small-farm poultry processing is not hard to do if you have some good equipment. Even an 11 year old kid can process chickens, as I wrote about awhile back in this photo essay.


One of the most useful and, to my way of thinking, absolutely necessary pieces of processing equipment is an automatic feather plucker. Not one of those revolving drums that you have to hold the birds up to, one at a time. I’m talking about a tub plucker. With a tub plucker you drop one or more birds into the tub and simply watch the show. That's how my homemade Whizbang chicken plucker works. It will pluck two chickens clean in 15 seconds and THIS WEB SITE will tell you all about it.  But in this essay I want to tell you about the Whizbang Chicken Scalder I invented....


Before you can pluck a chicken, you have to scald it, which means, you have to dunk it in hot water. Scalding loosens the feathers, thus allowing for fast, easy, efficient plucking.


For several years I scalded my family's chickens using a big pot of water heated over a propane burner. I purchased the pot and burner together as a turkey deep-fry outfit. A thermometer came with the equipment too.


A pot of water, heated in the back yard, does a fine job of scalding birds. You must keep a close eye on the temperature using the thermometer. If you scald too hot, the bird’s skin will tear when you pluck it. If you scald too cold, the feathers will not come out like you want them to. There is a bit of a trick to getting the best scald and I reveal the trick in THIS ESSAY.


With the pot-on-burner scalding system, you maintain optimum temperature by manually turning the burner on and off. Or, if it gets too hot, by adding some cold water. Because the pot is relatively small and you lose some water in the dunking process, you also have to add water frequently. So scalding in a simple pot over a flame is not carefree.


As with the plucker, you can buy ready-made scalders, but they are expensive. There are small, relatively cheap electric scalders but I understand they take a long time to heat up and are not well suited to scalding a lot of birds. A larger scalder with more capacity and better temperature controls will cost over $1,000.  That being the case, my challenge as a tightwad shade-tree inventor was to develop a scalder design that would automatically maintain a selected water temperature. In addition to that, I wanted my scalder to heat up quickly and have an insulated water tank. Portability was another feature I wanted. And I hoped to somehow incorporate an automatic bird dunker into the unit too.


It took me two years of tinkering but, in the end, I came up with a design that I was very pleased with. In the spring of 2005 I published the plan book, Anyone Can Build A Whizbang Chicken Scalder.


Since publishing the book, I have used my chicken scalder every year to process my family's flock of meat birds and I can tell you the unit continues to work flawlessly. No serious problems have developed. It is a remarkably useful tool.

The rest of this essay will introduce you to my unique scalder and give you some specific details about its construction. I’ll also tell you about the single little design flaw I’ve discovered and how to remedy it.


Before I launch into the details of this wonderful device, I want to make it clear that while I feel the Whizbang Plucker is a virtual necessity for backyard poultry processing, the Whizbang Scalder is more of a luxury. If, however, you are processing a lot of chickens as a home business, this scalder can really save you time and trouble. Let’s start with a front view of the unit...


Photobucket - Video and Image Hosting


What you’re looking at is the scalding tank, made from a propane hot water heater with the top cut off. The tank is attached with a ratcheting nylon strap to a wood framework, which I call the “dunking frame.” The frame serves three functions: 

1) it stabilizes the tank. Without the frame, the tank is more “tipsy” and that is not a good thing when you’re dealing with scalding-hot water. 

2) the frame holds the dunking mechanism which I’ll have more to say about shortly. 

3) the frame provides a place to attach the dunking and scalding controls.


The red band around the tank is a ratcheting nylon strap that secures the tank to the frame. The bicycle style wheels on either side of the frame make for easy portability. Tip the frame (with empty tank attached) back and it easily rolls where you need to go. The plywood pieces under one side are to level the unit up on my unlevel back yard. The handle on the side of the tank is completely unnecessary.


Here’s a top-down view of the unit....


Photobucket - Video and Image Hosting


Take note of the “dunking gondola” which is part of the unit’s auto-dunker. Birds are attached to the gondola which is suspended over the center of the hot water tank by a cable. The cable runs up to pulleys in an overhanging arm and back down to a revolving arm (visible in the photo). The gondola fits around, and slides over, the chimney that is positioned in the center of all propane water heaters.


The revolving arm is attached to a gear motor on the back side of the frame. The revolutions translate to a dunking action. 10 dunks per minute. I want to make it clear that the auto dunker is an option. You don't need it, but it sure is nice to have.


The refillable propane tank in the picture is what fuels the burner under the tank. I settled on propane over electricity because propane heats a given volume of water faster (I also think propane is safer than electricity, especially around water). A full tank of cold well water (around 20 gallons) will heat up to 145 degrees in an hour. The propane burner is 33,000 btu. The foam insulation around the tank does an excellent job of preventing heat loss and saving energy. The inside of the tank is coated with porcelain enamel, which is a durable and easy surface to keep clean. A layer of concrete in the bottom of the tank brings the bottom up to the level of the tank’s drain plug, thus facilitating easy washout.


Here is a picture of me clipping chickens into place on the dunking gondola...


Photobucket - Video and Image Hosting


The center flue pipe in the tank gets very hot so there is a heat shield on the gondola. Even still, if left there too long, it gets hot enough to cook the bird where it touches the pipe. By the way, I am incorrectly attaching the birds in the above picture. The tender meat of the breast should not be in contact with the hot pipe.


Here is a top-down view of the chickens being dunked all the way down into the water...


Photobucket - Video and Image Hosting


Here is a good place to discuss tank capacity. The dunking tank will accommodate chickens but not bigger birds like turkeys. I have dunked chickens that dressed out at 6.5 pounds and there was still room for a bigger chicken. I think it is safe to say that the tank will accommodate any size chicken.


To handle bigger birds, you would have to build a larger tank, then use the propane burner and temperature controls (which I’ll be showing you next). I don’t tell you how to build a turkey-size scalder in my book, but I do have a chapter with some ideas and advice along these lines.


That said, it turns out there is a way to easily modify a propane water heater so the tank will accommodate bigger birds. One poultry processor told me he made room for the bigger birds by using a torch to heat up the bottom of the tank. That softened the steel up enough for him to push the chimney all the way over to one side. Thus modified, he says the tank will scald big birds just fine, and he processes many hundreds of birds with his scalder every year.


Obviously, the gondola and auto dunker will not function with a crooked chimney, so hand dunking would, therefore, be necessary.


Photobucket - Video and Image Hosting


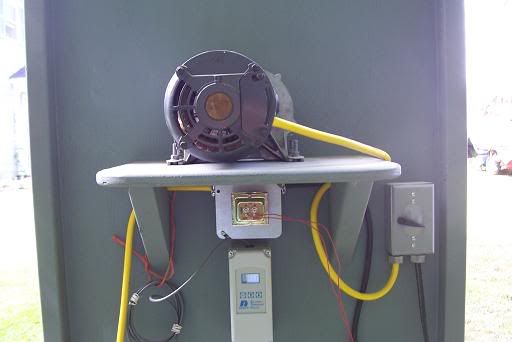
The above picture shows the back of the dunker frame. The motor on the shelf is a gear motor that turns at 10 rpm. The switch on the right turns the motor on and off. You turn the dunker off when the birds are sufficiently scalded. How, you may be wondering, do you know when they are sufficiently scalded? That’s easy. You simply do a wing and tail-feather pull test. When those big feathers pull out effortlessly, the birds are sufficiently scalded. 

You can scald three chickens at once and it typically takes less than a minute of dunking. So that translates to 120 chickens per hour (CPH). I don't know any backyard or small-farm processor that needs more capacity than that.


By the way, the gondola and dunking mechanism can be operated manually, thus saving the cost of an expensive gearmotor. All you have to do is put a handle on the end of the cable that connects to the gear motor arm.


Next picture please....


Photobucket - Video and Image Hosting


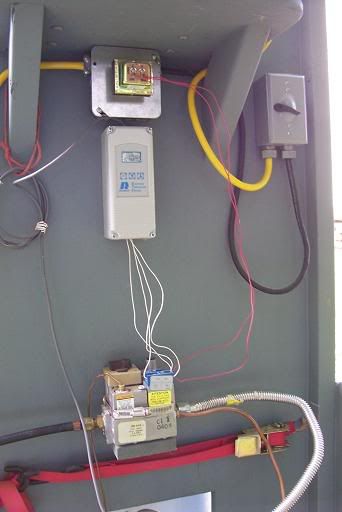
The above photo shows a transformer at the top (under the gear motor shelf). The transformer converts 120 volt household current to 24 volts, which is what the temperature controls work on.


And speaking of temperature controls, directly under the transformer is a wonderful piece of technology known as an electronic temperature controller (ETC). The ETC has a digital temperature readout. It tells you the temperature of your tank water at all times. A very nice feature!


Better yet, with a simple push-button procedure, you can program the ETC, telling it the temperature of scald water you want. The ETC then controls the gas valve which is the box-like thing in the bottom of the photo. The ETC tells the valve when to allow propane to the burner (if the water is cooler than desired) and when to shut the gas down (because the target water temperature has been reached).


The ETC on this Whizbang scalder works perfectly! The scald water temperature is automatically maintained within a 4 degree temperature range. It just doesn’t get much better than that.


Photobucket - Video and Image Hosting


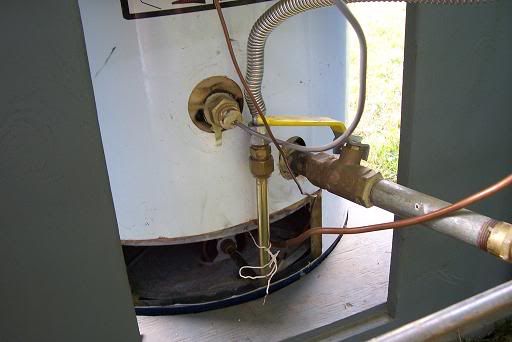
The above picture shows the back of the dunker frame underneath the gas valve. A gas supply line and a gas pilot line run from the valve to the water heater burner down under the water tank.


The circular thing near the center of the tank is where the water heater’s factory-issue temperature control and valve were once threaded in. Since the factory controls do not permit pinpoint temperature selection or a close range of temperature control, those parts were discarded. A temperature sensor is threaded into the opening where the factory controller was and a wire runs from there to the ETC.


The tank’s drain with a full-port ball valve is visible on the right side.


You will also notice a metal shaft barely visible in the bottom right of the picture. That is the axle for the two bicycle-style tires on either side of the dunker frame. Now let me explain the one design flaw I mentioned earlier....


Photobucket - Video and Image Hosting


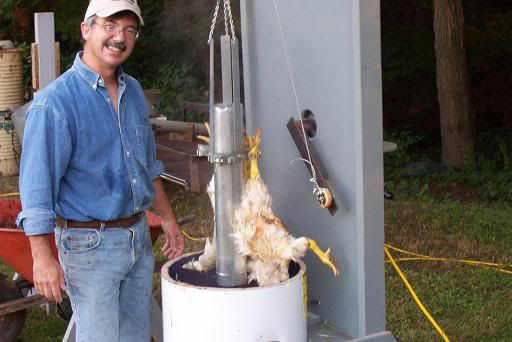
The goofy looking guy in the picture above is yours truly. But that’s not the design flaw. It just looks that way (my right eye isn't really "buggy"). But maybe I look just like you'd expect a chicken scalder inventor to look. Anyway, notice that the chicken is hanging from one leg? That’s the flaw. My son James said to me, “Look Dad. The chicken is waving.” I thought that was funny (maybe that’s why I have a smile on my face). That leg slipped out of the broom-holder leg clip on the gondola. That's what happens occasionally and it is an annoyance. It is, however, easy enough to prevent....


Photobucket - Video and Image Hosting


The photo above shows the solution to waving chicken legs. Simply put a u-shaped piece of stiff wire into the clips as shown above. The wire locks the feet in place. It is easy to put in and take out. Problem solved. (By the way, the chickens in this picture are clipped in the right way—with their back ends against the hot pipe.)


So there you have it—the Whizbang Chicken Scalder. 

With all the wires and hoses on the backside, it may look a little like “rocket science,” but it is really a very basic device. And it’s remarkably easy to build because my book gives you all the information you need to make your own Whizbang Chicken Scalder—one step at a time. I tell you where to get the harder-to-find parts and how to hook up the temperature controls and all of that. It’s all in the book.


==========


The one question I’m sure most everyone who reads this will have is: “How much does one of those things cost?” Here are some answers (based on early 2005 prices):


A brand new water heater will set you back around $300. Brand new is, however, not necessary, as I explain in the book. Many propane water heaters are scrapped because the controls are shot. But the tank is still sound. You don’t even want the factory temperature controls—just the tank and burner. Many plumbers and places that sell water heaters are more than happy to give you the junkers. All you gotta do is ask.


Materials for the dunker frame (all new) will set you back around $125.


The Deluxe temperature controls will cost around $250. (and you’ll agree they’re worth every penny of that once you see how well they maintain the temperature—automatically)


Parts to build the auto dunker will be around $400.


If you’re a good scrounger, I’ll bet you could build the basic scalder with automatic and precise temperature control (not including the auto dunker) for around $400.


As I mentioned earlier, brand new, already made, gas-fired scalders (without a dunker mechanism) will cost you over $1,000.


If you compare the features and benefits and costs associated with any readymade scalder on the market to the humble homemade Whizbang, I think you’ll find the Whizbang comes out ahead. That is, of course, a slightly biased opinion on my part. ;-)

==========

Here are links to some other poultry processing essays I've written:


Boys Will Be
Warriors
(Part 2)

Dateline: 18 September 2006

In my previous blog entry I wrote about men and boys and testosterone, and I showed you the medieval battle axes and shields my two sons, Robert and James, made out of scrap wood.

They were inspired to make and use the weapons after watching the movie Braveheart. Another source of inspiration was, I suspect, the day a few years back when we went to the Higgins Armory Museum in Massachusetts. The museum houses an impressive collection of very old body armor and weaponry.

One weapon that was displayed at the museum was a mace (many of them, actually). A Mace consists of a spiked steel ball connected by a chain to a handle. The ball is swung and used to deliver devastating blows on an opponent. It is a horrible thing to contemplate.

Well, imagine my surprise as I returned home from work one day a couple weeks ago and found my two boys on the lawn swinging homemade maces at each other!

The thought occurred to me that maybe this time they had gone too far. As my car came to a stop in the driveway, Robert and James came over, big smiles on their faces, to show me what they had made. I have to admit that I was impressed with their resourcefulness and creativity. Here’s a photo of my sons with their maces...


The weapons are made with wood from the woods, screw eyes, and some hefty chain. I asked them where they got the hardware and they told me Marlene took them to the hardware store in Moravia. I was, frankly, shocked to hear that my wife had assisted them in the creation of such frightful weaponry.

They showed me how they took turns swinging the mace at each other. One boy would get it moving in full circles over his head while the other stood just beyond range holding his shield. Then they moved towards each other until the chunk-of-wood-for-a-ball slammed into the shield. Then they both took up their mace and swung them in circles, as shown in this next photo...


Eventually, the chains connected and tangled so they had a tug of war, as shown in this next picture...


Aftere their little demonstration, I tried swinging the mace. It was a good feeling and I realized I had a tremendous amount of power in my hand. I wondered what I might try it out on. The thought came to me that I could bash the windows out of our Ford Taurus field car. What a thrill that would be!

But I did not do that. I kept the thought to myself (until now) and told the boy warriors not to do any damage to themselves or our property.

When I went in the house I remarked to Marlene how surprised I was that she took Robert and James to the hardware store so they could buy materials to build maces. There was a degree of exasperation in her tone as she insisted that she didn’t know that’s what they were making.

Later, at the dinner table, as we discussed the weapons, I told the kids that their maces would be more realistic if they pounded a bunch of nails half way in all over the ball end.

Upon hearing this, Marlene almost choked on her dinner. For some reason she did not think putting nails in the ball was a good idea, and she said so. That being the case I decided not to further suggest that the mace builders could, after the nails were pounded in, use some sidecutter pliers to snip the heads off and my Dremel tool with a sharpening stone to grind a point on the ends.

Of course, I was just kidding with the nail suggestion. Really, I was.

Since that day, I’ve seen a few overgrown zucchini squash mace-smashed on the lawn but there is no property damage to report. Robert did put a good lump on his shin from a bounceback but we have not had to make any trips to the emergency room. And the field car? It still has all its windows... for now.

=========

If you’d like to make your own mace, go for it. Here are some specifics. The block-of-wood-for-a-ball is about 5” in diameter and 5” long. The heavy duty chain on Robert’s mace is 3.5 feet long. James’s is 3 feet. I like the 3 foot length best. The handles are about 1.5 inches in diameter and 8 inches long. Screw eyes to hold the chain are threaded into the handle and block of wood.

==========

If you need a practical reason to build your own mace, here it is... Swinging a mace is good exercise. And swinging two at a time, one in each hand, is even better exercise. it’s also something of a coordination challenge. Here’s a picture of Robert swinging both after I showed him it could be done...


We’re working on developing a series of fancy mace moves and tricks. Throwing the mace at targets is also fun. I’m even thinking of putting together a new mace-swinging exercise video. ;-)


Boys Will Be.....
Warriors
(Part 1)

Dateline: 13 September 2006

I believe men are mandated by God to do three things: lead, protect, and provide. And I believe God has equipped men to fulfill that mandate by designing and creating us different than women. The root source of the difference boils down to a chemical hormone called testosterone.

Boys who are in the process of growing up to be men have testosterone too. Lots of it. This abundance of the hormone makes boys more physical and aggressive than girls. Such aggressiveness can be a bad thing if it is channeled and expressed improperly. But it can be a very good thing if properly managed and directed.

As a father of three boys, ages 11 to 18, I see in my sons a desire to compete among themselves and their other male friends. Feats of strength and endurance are an everyday thing, as is wrestling.

Most mothers are shocked and alarmed by the testosterone-induced roughhousing of their boys. My wife is no exception. But I assure her it is normal and good. Just because they act aggressive doesn’t mean they are going to be juvenile delinquents or grow up to be criminals. After all, I tell her, I was the same way when I was a boy and look at how I turned out. Marlene gives me a funny little smile when I tell her that.

In any event, this is where a father comes into the picture, especially a Christian father. As such, I see it as my responsibility to set boundaries and to explain to my sons that God designed them with a warrior spirit for a good reason. Examples abound of ungodly men who misuse their strength by employing it to harm others while pursuing selfish desires. But God expects those men who call Him Lord to be servant warriors—to lead, protect, and provide, first within their families, then within their community.

Many men labor quietly for a lifetime, leading, protecting, and providing for their families, and we hear little of them. But they are the quiet heroes who leave a legacy of example for their children. Then there are the examples of men who, when needed, rise to a more visible calling. Todd Beamer comes to mind. When United Airlines flight 93 was hijacked by terrorists on September 11, 2001, Todd Beamer was a passenger. As he became aware of the situation he was in and the murderous intent of the hijackers, his warrior spirit kicked into gear. It led him, and other men with him, to confront the perpetrators of evil. ”Let’s Roll! were the last words he was heard to say as he headed out to do battle. That’s testosterone for you.

Then there is the story of David in the Bible. Not even a man yet, the youngest son of Jesse was visiting his older brothers in the army of Israel. He heard the giant Goliath taunting and challenging the Israelites to send someone to fight him. He had been doing this for days. Everyone feared the giant. But David, when he realized the situation, did not hesitate to volunteer to fight. That’s testosterone for you.

Then, when you read the biblical account (1 Samuel 17) you’ll find that David did not hide from afar and sling his stone. No, it says he ran towards the giant!

And when the stone from his sling buried itself into the brain of the Philistine, David ran up to the fallen body, took the giant’s sword, and cut his head off. Now that’s testosterone.

By the way, it is common to see artistic renderings of David with his sling and shepherd clothing facing the armored and angry Goliath. But have you ever seen the shepherd boy after the battle, standing by the dead carcass, holding the giant’s severed head aloft?

We live in a fallen realm. Godly men must, when the necessity arises, defend the good against that which is evil. What about the Biblical admonition to turn the other cheek? I agree with it, of course. But I see that as a personal admonition. If someone is harming or intending to harm my family, others in my community who are incapable of defending themselves, or my nation, it is not personal. In such instances, godly men have a responsibility to do what God has wired them to do.

We men can protect in many nonviolent ways. For example, homeschooling is a way of protecting children from a government school culture that, under the guise of religious neutrality, actually labors to indoctrinate and convert all children to its secular faith—a faith that is completely at odds with true Christianity.

But sometimes, as I’ve already noted, men are required to physically fight in their roles as defenders. Such violence can be an ugly thing. Blood and gore, pain, suffering, and even death are not pleasant things to think about, let alone experience, but they are a reality that must be faced and dealt with by peace-loving Christian men, as God leads them.

A few years ago, Mel Gibson starred in the movie, Braveheart. It is a hollywood interpretation of the true story of William Wallace. He was a man who, with far more testosterone, conviction, and faith than most men, led a 13th century Scottish revolt against English tyranny and conquest.

I have Scottish ancestry on both sides of my family. When I hear the pipes, something deep in me stirs. When I watch the battle scenes in Braveheart, the emotion wells up in me. I want to be with Wallace on the field of battle at Falkirk, July 22, 1298, facing the English King Edward’s finest armored calvary. Gripping the long, sharpened, poles that will meet the horses, I know the odds are that I will die. But I would be there anyway. Because the cause was just and that is what men do. That is what men were born to do.

The point of all this is that I believe it is okay for boys to act out the part of warriors. And so it is that I introduce you to the following photos. My sons, Robert and James, after watching Braveheart, were inspired to make their own weapons—shields and battle axes. Here, in this first photo, are the implements of warfare, created with scrap wood, their dad’s jigsaw, nails (lots of nails) and imagination.....


And here are the boy warriors with their weapons prior to doing battle......


Now the battle commences. Robert delivers a mighty blow. James deflects it with his shield.......


And James returns the blow (I love the facial expression on this one). Back and forth the battle rages, each boy swinging his weapon at the other. This is an awesome spectacle....


And then, oh my, one of the warriors takes a swing at the camera man!....


(Stay tuned for more great examples of boys being warriors in my next blog entry....)