Dateline: 20 September 2006

Bug-eyed scalder inventor and waving chicken
One of the most useful and, to my way of thinking, absolutely necessary pieces of processing equipment is an automatic feather plucker. Not one of those revolving drums that you have to hold the birds up to, one at a time. I’m talking about a tub plucker. With a tub plucker you drop one or more birds into the tub and simply watch the show. That's how my homemade Whizbang chicken plucker works. It will pluck two chickens clean in 15 seconds and THIS WEB SITE will tell you all about it. But in this essay I want to tell you about the Whizbang Chicken Scalder I invented....
Before you can pluck a chicken, you have to scald it, which means, you have to dunk it in hot water. Scalding loosens the feathers, thus allowing for fast, easy, efficient plucking.
For several years I scalded my family's chickens using a big pot of water heated over a propane burner. I purchased the pot and burner together as a turkey deep-fry outfit. A thermometer came with the equipment too.
A pot of water, heated in the back yard, does a fine job of scalding birds. You must keep a close eye on the temperature using the thermometer. If you scald too hot, the bird’s skin will tear when you pluck it. If you scald too cold, the feathers will not come out like you want them to. There is a bit of a trick to getting the best scald and I reveal the trick in THIS ESSAY.
With the pot-on-burner scalding system, you maintain optimum temperature by manually turning the burner on and off. Or, if it gets too hot, by adding some cold water. Because the pot is relatively small and you lose some water in the dunking process, you also have to add water frequently. So scalding in a simple pot over a flame is not carefree.
As with the plucker, you can buy ready-made scalders, but they are expensive. There are small, relatively cheap electric scalders but I understand they take a long time to heat up and are not well suited to scalding a lot of birds. A larger scalder with more capacity and better temperature controls will cost over $1,000. That being the case, my challenge as a tightwad shade-tree inventor was to develop a scalder design that would automatically maintain a selected water temperature. In addition to that, I wanted my scalder to heat up quickly and have an insulated water tank. Portability was another feature I wanted. And I hoped to somehow incorporate an automatic bird dunker into the unit too.
It took me two years of tinkering but, in the end, I came up with a design that I was very pleased with. In the spring of 2005 I published the plan book, Anyone Can Build A Whizbang Chicken Scalder.
Since publishing the book, I have used my chicken scalder every year to process my family's flock of meat birds and I can tell you the unit continues to work flawlessly. No serious problems have developed. It is a remarkably useful tool.
The rest of this essay will introduce you to my unique scalder and give you some specific details about its construction. I’ll also tell you about the single little design flaw I’ve discovered and how to remedy it.
Before I launch into the details of this wonderful device, I want to make it clear that while I feel the Whizbang Plucker is a virtual necessity for backyard poultry processing, the Whizbang Scalder is more of a luxury. If, however, you are processing a lot of chickens as a home business, this scalder can really save you time and trouble. Let’s start with a front view of the unit...
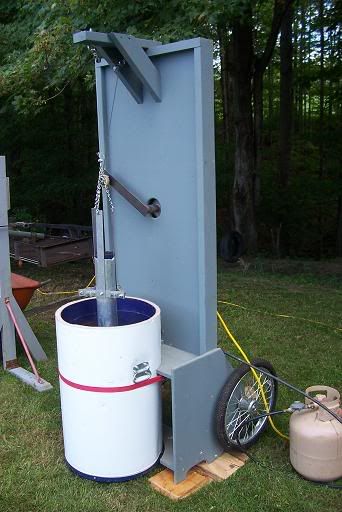
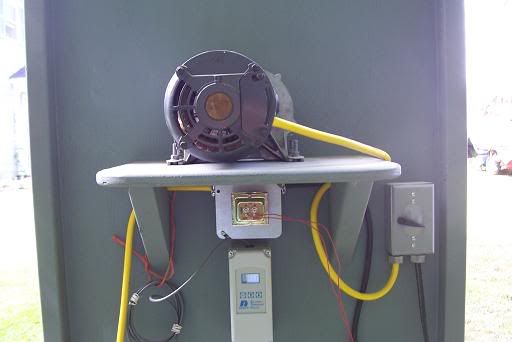
What you’re looking at is the scalding tank, made from a propane hot water heater with the top cut off. The tank is attached with a ratcheting nylon strap to a wood framework, which I call the “dunking frame.” The frame serves three functions:
1) it stabilizes the tank. Without the frame, the tank is more “tipsy” and that is not a good thing when you’re dealing with scalding-hot water.
2) the frame holds the dunking mechanism which I’ll have more to say about shortly.
3) the frame provides a place to attach the dunking and scalding controls.
The red band around the tank is a ratcheting nylon strap that secures the tank to the frame. The bicycle style wheels on either side of the frame make for easy portability. Tip the frame (with empty tank attached) back and it easily rolls where you need to go. The plywood pieces under one side are to level the unit up on my unlevel back yard. The handle on the side of the tank is completely unnecessary.
Here’s a top-down view of the unit....
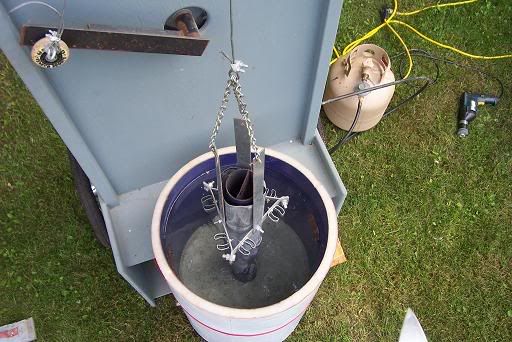
Take note of the “dunking gondola” which is part of the unit’s auto-dunker. Birds are attached to the gondola which is suspended over the center of the hot water tank by a cable. The cable runs up to pulleys in an overhanging arm and back down to a revolving arm (visible in the photo). The gondola fits around, and slides over, the chimney that is positioned in the center of all propane water heaters.
The revolving arm is attached to a gear motor on the back side of the frame. The revolutions translate to a dunking action. 10 dunks per minute. I want to make it clear that the auto dunker is an option. You don't need it, but it sure is nice to have.
The refillable propane tank in the picture is what fuels the burner under the tank. I settled on propane over electricity because propane heats a given volume of water faster (I also think propane is safer than electricity, especially around water). A full tank of cold well water (around 20 gallons) will heat up to 145 degrees in an hour. The propane burner is 33,000 btu. The foam insulation around the tank does an excellent job of preventing heat loss and saving energy. The inside of the tank is coated with porcelain enamel, which is a durable and easy surface to keep clean. A layer of concrete in the bottom of the tank brings the bottom up to the level of the tank’s drain plug, thus facilitating easy washout.
Here is a picture of me clipping chickens into place on the dunking gondola...
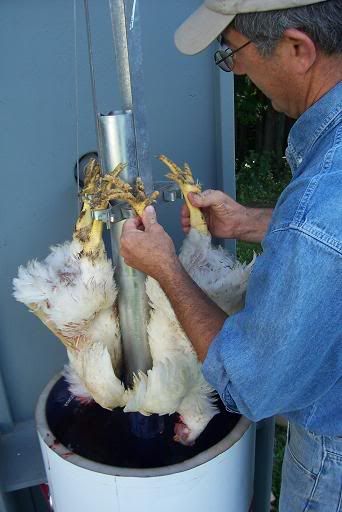
The center flue pipe in the tank gets very hot so there is a heat shield on the gondola. Even still, if left there too long, it gets hot enough to cook the bird where it touches the pipe. By the way, I am incorrectly attaching the birds in the above picture. The tender meat of the breast should not be in contact with the hot pipe.
Here is a top-down view of the chickens being dunked all the way down into the water...
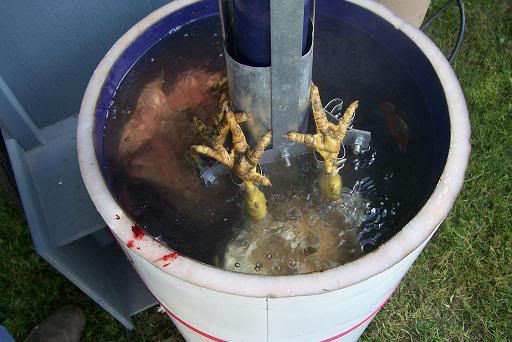
Here is a good place to discuss tank capacity. The dunking tank will accommodate chickens but not bigger birds like turkeys. I have dunked chickens that dressed out at 6.5 pounds and there was still room for a bigger chicken. I think it is safe to say that the tank will accommodate any size chicken.
To handle bigger birds, you would have to build a larger tank, then use the propane burner and temperature controls (which I’ll be showing you next). I don’t tell you how to build a turkey-size scalder in my book, but I do have a chapter with some ideas and advice along these lines.
That said, it turns out there is a way to easily modify a propane water heater so the tank will accommodate bigger birds. One poultry processor told me he made room for the bigger birds by using a torch to heat up the bottom of the tank. That softened the steel up enough for him to push the chimney all the way over to one side. Thus modified, he says the tank will scald big birds just fine, and he processes many hundreds of birds with his scalder every year.
Obviously, the gondola and auto dunker will not function with a crooked chimney, so hand dunking would, therefore, be necessary.
The above picture shows the back of the dunker frame. The motor on the shelf is a gear motor that turns at 10 rpm. The switch on the right turns the motor on and off. You turn the dunker off when the birds are sufficiently scalded. How, you may be wondering, do you know when they are sufficiently scalded? That’s easy. You simply do a wing and tail-feather pull test. When those big feathers pull out effortlessly, the birds are sufficiently scalded.
You can scald three chickens at once and it typically takes less than a minute of dunking. So that translates to 120 chickens per hour (CPH). I don't know any backyard or small-farm processor that needs more capacity than that.
By the way, the gondola and dunking mechanism can be operated manually, thus saving the cost of an expensive gearmotor. All you have to do is put a handle on the end of the cable that connects to the gear motor arm.
Next picture please....
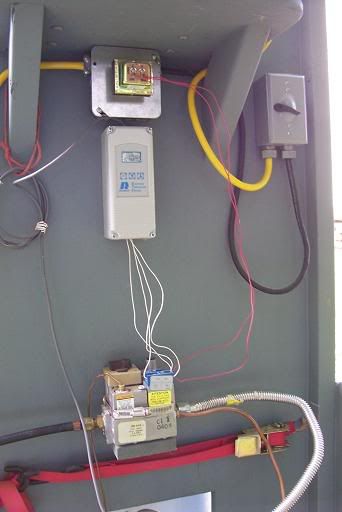
The above photo shows a transformer at the top (under the gear motor shelf). The transformer converts 120 volt household current to 24 volts, which is what the temperature controls work on.
And speaking of temperature controls, directly under the transformer is a wonderful piece of technology known as an electronic temperature controller (ETC). The ETC has a digital temperature readout. It tells you the temperature of your tank water at all times. A very nice feature!
Better yet, with a simple push-button procedure, you can program the ETC, telling it the temperature of scald water you want. The ETC then controls the gas valve which is the box-like thing in the bottom of the photo. The ETC tells the valve when to allow propane to the burner (if the water is cooler than desired) and when to shut the gas down (because the target water temperature has been reached).
The ETC on this Whizbang scalder works perfectly! The scald water temperature is automatically maintained within a 4 degree temperature range. It just doesn’t get much better than that.
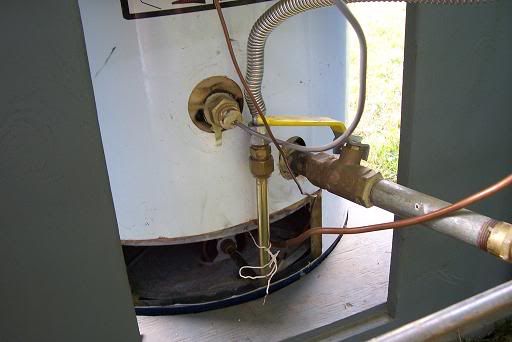
The above picture shows the back of the dunker frame underneath the gas valve. A gas supply line and a gas pilot line run from the valve to the water heater burner down under the water tank.
The circular thing near the center of the tank is where the water heater’s factory-issue temperature control and valve were once threaded in. Since the factory controls do not permit pinpoint temperature selection or a close range of temperature control, those parts were discarded. A temperature sensor is threaded into the opening where the factory controller was and a wire runs from there to the ETC.
The tank’s drain with a full-port ball valve is visible on the right side.
You will also notice a metal shaft barely visible in the bottom right of the picture. That is the axle for the two bicycle-style tires on either side of the dunker frame. Now let me explain the one design flaw I mentioned earlier....
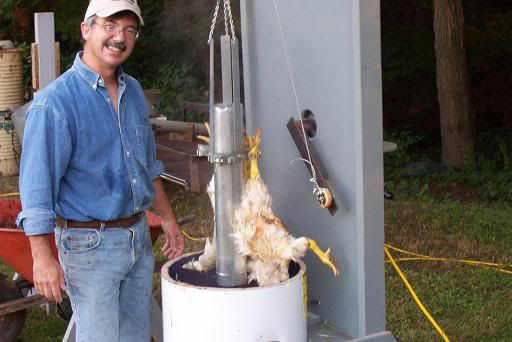
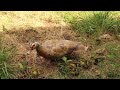
The goofy looking guy in the picture above is yours truly. But that’s not the design flaw. It just looks that way (my right eye isn't really "buggy"). But maybe I look just like you'd expect a chicken scalder inventor to look. Anyway, notice that the chicken is hanging from one leg? That’s the flaw. My son James said to me, “Look Dad. The chicken is waving.” I thought that was funny (maybe that’s why I have a smile on my face). That leg slipped out of the broom-holder leg clip on the gondola. That's what happens occasionally and it is an annoyance. It is, however, easy enough to prevent....
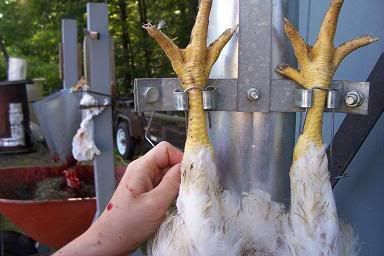
The photo above shows the solution to waving chicken legs. Simply put a u-shaped piece of stiff wire into the clips as shown above. The wire locks the feet in place. It is easy to put in and take out. Problem solved. (By the way, the chickens in this picture are clipped in the right way—with their back ends against the hot pipe.)
So there you have it—the Whizbang Chicken Scalder.
With all the wires and hoses on the backside, it may look a little like “rocket science,” but it is really a very basic device. And it’s remarkably easy to build because my book gives you all the information you need to make your own Whizbang Chicken Scalder—one step at a time. I tell you where to get the harder-to-find parts and how to hook up the temperature controls and all of that. It’s all in the book.
==========
The one question I’m sure most everyone who reads this will have is: “How much does one of those things cost?” Here are some answers (based on early 2005 prices):
A brand new water heater will set you back around $300. Brand new is, however, not necessary, as I explain in the book. Many propane water heaters are scrapped because the controls are shot. But the tank is still sound. You don’t even want the factory temperature controls—just the tank and burner. Many plumbers and places that sell water heaters are more than happy to give you the junkers. All you gotta do is ask.
Materials for the dunker frame (all new) will set you back around $125.
The Deluxe temperature controls will cost around $250. (and you’ll agree they’re worth every penny of that once you see how well they maintain the temperature—automatically)
Parts to build the auto dunker will be around $400.
If you’re a good scrounger, I’ll bet you could build the basic scalder with automatic and precise temperature control (not including the auto dunker) for around $400.
As I mentioned earlier, brand new, already made, gas-fired scalders (without a dunker mechanism) will cost you over $1,000.
If you compare the features and benefits and costs associated with any readymade scalder on the market to the humble homemade Whizbang, I think you’ll find the Whizbang comes out ahead. That is, of course, a slightly biased opinion on my part. ;-)
==========
Here are links to some other poultry processing essays I've written:


.JPG)
.JPG)

.JPG)

.JPG)


.JPG)


14 comments:
Hi patti,
What an interesting observation on your part.
It is my policy not to name chickens destined for the freezer.
And I don't know about French revolution, but it is definately Whizbang revolution.
;-)
Excellent job!
Nice reuse of materials! One question though: since you only need 145 degrees, why not just use the temp sensor and control that came with the water heater? On most of the propane water heaters, it adjusts from 120F up past 160F by turning the dial on the gas control. Just curious. Can't wait to build one!
just wanted to say that the scalder is really neat and you did a good job i was thinking have you seen the clips that roll when you put a broom handle in them and tighten up against the handle i dont know if that would work or not still it is a good job
Hi Walter,
Thanks for your comment. It's nice to hear from you!
rob yeley-
I think I looked at those clips and came to the conclusion that I didn't think they would work. But I might be wrong.
Wayne in FL-
The propane heater I used is a 40 gallon unit. I had hoped it would heat up and regulate with the stock temperature controls. When I turned the temp selector all the way up the water heated to exactly 145 degrees and shut off. That was good. But then the water cooled down to 130 degrees before the heater kicked on again. That kind of temperature swing is unacceptable for scalding. If it dropped to 140 degrees and kicked on, that would be fine.
As far as I know, there is no way to regulate the factory temperature controls. They have a mind of their own. However, I did come up with a way to trick the controls into thinking the water had cooled down to 130 degrees.
I glued together a length of 1-1/2: PVC pipe with a short 90-degree bend on the end. When my thermometer told me the water temperature dropped to 140 or 141, I put the pipe down into the tank so the end was over the temperature sensor that sticks into the tank near the bottom. Then I sprayed cold water with a hode into the top of the pipe. The sensor thought the tank had cooled down and kicked on, heating up to 145 degrees again.
So there is a way to regulate temperature with factory controls but it is not automatic and takes a lot of close attention. Also, if you wanted to heat the water hotter to scalde ducks or geese (160 to 165 degrees is better for such fowl) you would not be able to do it with the factory controls. At least not on the unit I bought and I ran it through the paces with good quality electronic temperature test equipment.
The souped up temperature controls on my scalder are what makes it such an incredibly nice scalding machine.
Thanks for asking, Hope that helps.
Thank you for posting this Herrick. I am very appreciative of your costing the whole outfit for me- it makes it easier to save/budget it into our finances. I found my two oldest sons on your blog this morning studying this and your other post concerning your Whizbang Plucker.
And we make it a habit of never naming anything we eat either. Just makes it hard to swallow, eh? :-)
In grace,
Carla Lynne
Hi Carla,
Making a plucker would be a great project for your sons. It really does make poultry processing fun!
Hi Patti-
I knew it was a joke. :-D Unfortunately verbal inflections, facial expressions, and such can't be properly given and received on the internet.
Herrick,
Does your scalder have an automatic timer or do you have to time it and stop it yourself? In other words, could I hook a few birds up, start the process and do something else (eviscerate a bird) and come back to a properly scalded bird, or would it still be dunking a boiled chicken?
Hello anonymous,
No, there is no automatic timer. I considered this but found that, even with the precise temperature control, optimum scalding time varied. The best way to determine "doneness" of a scald is the wing or tailfeather pull test. You could set a timer for a minute and turn your attention to other tasks for that amount of time, before returning to the scalder. It's surprising what you can get done in a minute.
Herrick,
I have the opportunity to get a FREE natural gas water heater. I am thinking that maybe I can replace the burner with a LP burner. Do you have any thoughts on whether that would be a possibility? The water heater is 20" in diameter and 53" tall, so it seems to be the right size. Surely a LP burner would be cheaper than a whole new water heater, no?
Anyway, if you could share your thoughts, I would appreciate them,
Grace & Peace,
Don
Hey Don
I think you only have to change the orifices, not the burner.
Ron
What a fabulous invention!! My husband and i farm in central virginia and butcher 25-50 birds a year but would do more if we could scald and pluck easier. If you have directions for both machines in books i want to buy them. Could you email me at doc.leni@gmail.com for specifics - address, cost? I appreciate your response.
Leni Sorensen
That's a pretty nice setup! I have one that uses the broom handle clips too, and I have the waving chicken problem from time to time. I think I will make some of your U-pins to have handy for the occasional bird leg that doesn't want to stay in.
However, as I looked at your design, I thought that the design flaw you were going to mention was the small size of the tank drain hole. I realize that you are just using the drain hole that you are given on a hot water tank. But in my experience, after doing a bunch of birds, the bottom of the tank is a pretty mess of dirt, poop, and feathers. I have a 2" drain port with a full port valve on it to drain the tank, and even then it sometimes wants to clog with feathers. So I can only imagine that the 3/4" port on a water heater would clog quite a bit, and in the end you would have to clean out the sludge by hand. That's not a very big deal I guess, but my point is just that if anyone is building a tank out of something else besides water heater and have the option of choosing your drain hole size, the bigger the better.
By the way, my setup uses a plastic 55 gallon drum as the tank (which is somewhat insulative) and two electric water heater elements running simultaneously. It has the same brand ETC as above. It works great and keeps the temp +/- 1 degree!
Thanks Herrick, for empowering people to do things themselves.
Hi Dan,
My experience with the full-port ball valve on the hot water heater tank is that it has not been a big problem. Yes, sometimes the drain flow slows down when clogged with feathers, but it's no problem to swish them away with a stick, and the water drains fast. When the water is out, I usually have to reach down and remove a handful of feathers. Then cleaning out gunk in the bottom is done with a hose, and it cleans up very well. I give the glass-lined sides of the tank a scrub with a soapy scotchbrite pad and rinse with the hose. It cleans very easily —no hard scrubbing necessary. That said, I appreciate your insights. A 2" ball valve would surely be better.
Post a Comment