Dateline: 14 January 2007
It all started with an old wooden desk that had been kicking around our house for a long time. It was maybe 50 years old and nothing particularly special. Some of the drawers were broken as were many of the glue joints in the framework that contained the drawers. If the desk was a genuine antique, it would have been worth repairing. Or if it was something really well-made to start with, it probably would have justified fixing. But it was neither of those things. It looked like a lot of worn-out old desks that end up in pieces out by the curb to be hauled away during “spring cleanup days” in Moravia (the nearest small town to me).
I had my boys carry the worn out desk to my workshop so we could knock it apart and throw it in the woodstove. If nothing else it would help keep my shop warm. But as I looked at the desk it occurred to me that maybe I could recycle the wood into some sort of project. What a great lesson it would be for my sons to see the old desk be put to better use than firewood.
I decided that I would build two hanging shelves with small drawers underneath the shelf. There were two sections of wall in the house that I would size the shelves to fit on. I would make the longer shelf, with four drawers and, at the same time, my son Robert would make a shorter version, with three drawers.
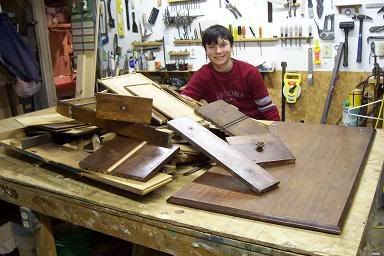
Here’s a picture of Robert in my workshop with all the pieces of the desk piled on the workbench.
The wood in the desk was primarily poplar, with some other lower grade wood that I could not identify. The desktop had a mahogany veneer over a solid wood core of poplar. Here’s a picture of Robert routing an edge detail around the shelf board. This was the first time he has used a router to make a decorative edge.

Robert and I plugged away at the project off and on over the course of three or four weeks. There was a lot of table saw cutting in the drawers. I did that part because I don’t want Robert to use the table saw yet. But I do let him use the radial arm saw and he used that to cut many parts to size.
Every single piece of wood in the shelves came from the old desk, even the knobs on the little drawers. We carved them out of a piece of ¾”wood. I carved my four pulls and Robert carved his three. The challenge was to make them as alike as possible. We carved then using a little, tabletop bandsaw and a mini sanding wheel in a Dremel tool. They came out remarkably well.
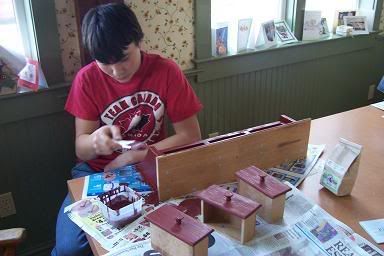
Then we went to the Old Fashioned Milk Paint Company on the internet and picked out colors for our shelves. Robert chose Barn Red and I decided to try black. Here is a picture of Robert painting his shelf with milk paint at the kitchen table.
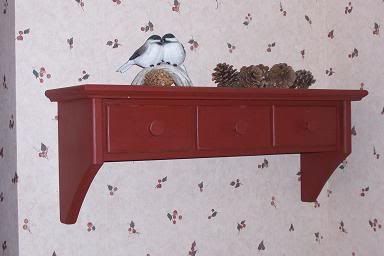
After the milk paint dried, we brushed boiled linseed oil over the paint and rubbed it in with some 320 grit wet-dry sandpaper. This rendered a very smooth finish. The sanding also rubbed away the paint in some places, which gave the finish a comfortable, worn, older look—just what you want with yeoman furniture. Then we painted on a few more coats of linseed oil. Each coat was left on for maybe 15 minutes before wiping excess oil off and letting it dry. Here’s what Robert’s finished shelf looks like…
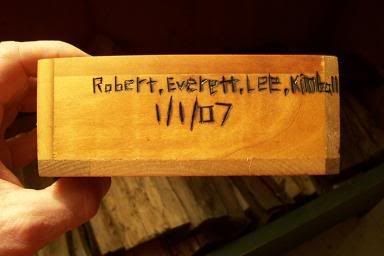
Robert took a real interest in this creative project and was very pleased with the finished result. He decided to use the woodburner he got for Christmas to put his initials and date on the back of the shelf. Then he burned his name into the back on one of the little drawers. He felt like he messed up his name in the drawer but I think he did just fine…
Robert asked if he would be able to put the shelf in his own house someday. I told him yes, of course, and we can make other furniture for his future home too.
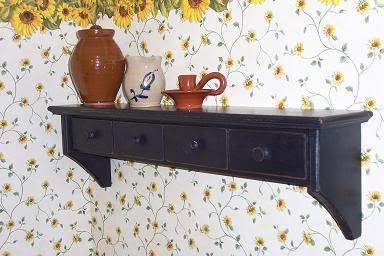
Then there is my shelf, which we put in the kitchen. Marlene was concerned that the black milk paint would not look very good, but she likes the shelf just fine now. A black, hand-rubbed finish with worn spots looks “authentically old.”
The pottery pieces on the shelf (seen below) are from Sturbridge Village. We went there for vacation a couple years ago and James came into possession of the handcrafted pottery as a result of winning a turnip toss contest. I wrote about it here.


.JPG)
.JPG)


.JPG)

.JPG)


.JPG)


3 comments:
The shelves are beautiful! You and Robert did an excellent job, and he's learning some valuable skills. Tell him that I think his name looks fine - it has that primitive look to it that gives it that unique, one-of-a-kind flavor. Dwayne is hoping to get some kind of set-up going in the barn to make small items such as these to sell. We have lots of wood we can recycle...including an old oak desk! P.S. We gave my father-in-law a Dremel for Christmas. Was he ever tickled speechlees!
Your shelves came out beautifully. What a great father-son project! You have a special family, but I think you know that.
K
I had not even thought of milk based paint! As I am running into a lot of chemical sensitivities of late and not liking the headaches and other problems, I am so blessed to have run across your blog! I have been browsing through it since I found the "horse chow" blog regarding the Nearings, which I had originally been searching for info on their 4 - 4 schedule.
The shelves look great and probably still look great today! And your son did a great job on his name!
Post a Comment