Dateline: 8 April 2008
In Part 1 of this how-to series I explained that my family makes maple syrup on a small scale in our back yard, and I explained our reasons for doing so—reasons beyond just maple syrup. Now I’m going to launch into the details of our particular little operation by telling (and showing) you how we tap trees....
This year we tapped our maple trees on Saturday, March 15. It was foggy and overcast all day but the temperature was in the 40s and the sap was “running.” Cold nights and above freezing days will get the sap flowing.
I was up at daybreak. The rest of my family was still sleeping. Not a problem. I tapped 24 trees by myself and I took my time. Later, I got my son, Robert, to help with the pictures that follow.
Tapping maple trees by oneself on a foggy morning in March is the antithesis of working in a factory in the city, which is what I do five days a week. It was quiet and peaceful in the woods. The air was fresh. I could clearly hear the water rushing through the stream that runs through our woods. But a rushing stream does not make noise; it is a quiet, natural, therapeutic sound. So, yes, I took my time. I savored the experience.
We tap only 25 sugar maple trees because that’s pretty much all the properly sized trees we have available to tap on our small acreage. Our sap storage and boiling operation (as I’ll be showing and explaining later in this series) is sized for that number of taps. If we tapped more trees, we would need to re-engineer our whole small-scale system.
Our woods are directly behind our house, along a gully, and on the west side in an overgrown old family cemetery. So our trees are all within walking distance of our yard.
According to Rink Mann’s book Backyard Sugarin', every tap you put in will translate to about a quart of finished maple syrup per season. we ended up with a better yield than that this year. But it is a good rule-of-thumb.
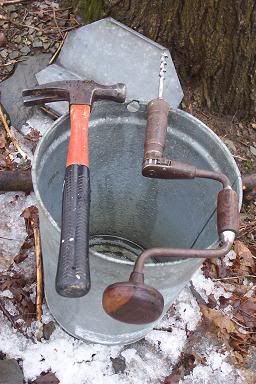
The following picture shows some basic tapping equipment: a galvanized steel sap bucket with a galvanized cover (in the background), a hammer, and hand brace with drill bit.
The first couple of years we made maple syrup we utilized recycled plastic milk jugs to collect the sap, as Rick Mann’s book explains. The jugs are free, and they work fine to collect sap. But they need emptying more frequently than a sap bucket. And if it gets cold, some of the sap will freeze. When this happens in a sap pail, you just take the ice off the top, throw it away, and pour your maple sap into your collecting bucket. But you can’t do that with a partially frozen jug of sap. I’ll tell you why we throw the ice away later in this series.
As you may know, a lot of maple syrup makers now utilize lengths of plastic tubing instead of old fashioned sap buckets to collect sap. They string the tubing from tree to tree and the sap flows along into a central collection tank. We don’t do that because I like sap buckets. They are simple and effective and, if properly cared for, should last a lifetime. Besides that, I hate plastic, or vinyl, or whatever that tubing is made of. The less plastic in my life, the better.
The buckets also clean out nicely. I’ve heard that the tubing is difficult and complicated to clean. We bought the buckets from a local maple equipment place used for something like three dollars each. The covers were a buck more. It was money well spent.
Trees are tapped by drilling a 7/16” hole into the tree with a brace and bit. 7/16” is the universally accepted proper size for a tap hole. And using a hand brace is the traditional method for drilling the hole. You could, of course, use a battery-powered electric drill to drill the holes. That would be faster and easier. But for 25 taps, I keep it simple.
Functional hand braces can be bought at flea markets for a few bucks. Don’t ever buy a brand new hand brace. They are way too expensive. If you need a 7/16” bit for the brace, you can get one at Lehman’s for a few bucks. Properly cared for, both brace and bit will last you the rest of your life and give you no problem. You can’t say that about a battery-powered drill.
You can tap a tree in 30 seconds with a brace and bit. This next picture shows Robert tapping tree #25.
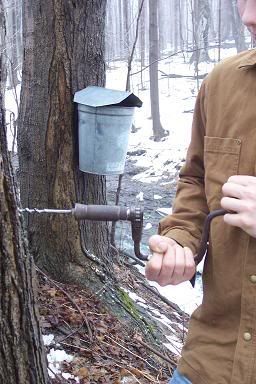
The tap hole should be drilled a couple inches deep and angled up just a bit. Robert’s drill bit could probably be angled up slightly more than the picture shows. But that's good enough. We drill the holes just above waist height. A little higher or lower makes no difference.
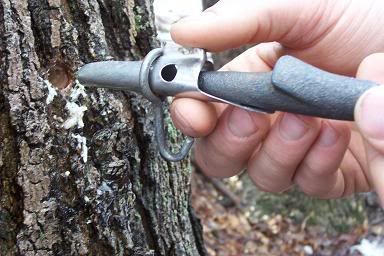
This next picture shows a sap spile with a pail hanging hook and a spile insertion tool, which is used to pound the spile into the hole.
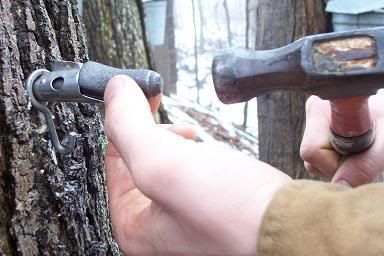
This next picture shows the spile insertion tool in the spile, and the spile being hammered in. The little tool serves to distribute and direct the force of the hammer blows so that the relatively thin metal of the spile is not deformed. A spile insertion tool is not absolutely necessary but it does the job it is designed to do and prolongs the useable lifespan of your spiles. The spile is pounded in until it is snug. Not too tight.
Once the spile is in the tree, the sap will start to drip out, unless the temperature is freezing. I love the sound of sap dripping into the bottom of an empty bucket.
Every maple tree has it's own sap characteristics. Some trees have better sap flow than others, and sugar concentration of sap varies between trees. Seeing as I was in no hurry the morning I tapped, I timed the drips from several trees. Some were producing 40 drips per minute. Most were around 60. My best tree, which also happens to be my biggest, was producing an incredible 120 drips a minute. That tree is always my best sap producer. I call it the “Big Dripper.”
I tried to take a picture of a drip falling off the end of a sap spile. This is the best I could do:
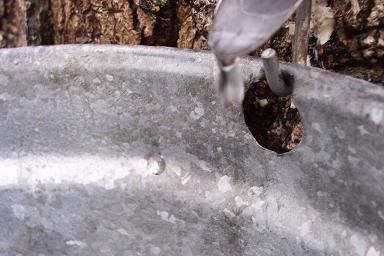
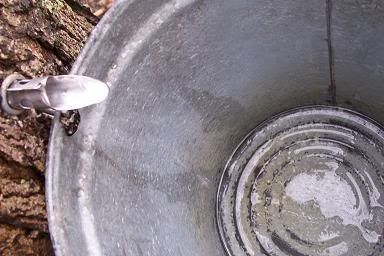
And here’s a drip's-eye view down into an empty bucket
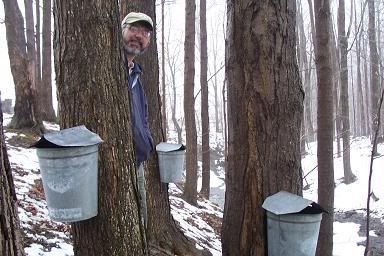
And, finally, Robert took a picture of yours truly amidst a cluster of sap buckets. You can see the steep bank and gully that is behind our house. “Big Dripper” is at the bottom of the gully, which means that collecting sap from that tree is harder than any of the others. In my next essay in this series, I’ll explain (and show) you how we collect and store the maple sap.
To be continued....
CLICK HERE to go on to Backyard Sugarin' Part 3: Collecting Sap
or
CLICK HERE to go back to Part 1 of this Backyard Sugarin' series.
#####
 |
| CLICK HERE to check out the Wood Family's "Sap to Syrup" DVD |


.JPG)
.JPG)


.JPG)

.JPG)


.JPG)


7 comments:
how far south do you suppose one could actually 'do' backyard sugarin'??
I chuckled when I read that you named your tree. :) And, naming it the Big Dripper is hilarious!
Does the hole close up over time? Do you re-drill the same hole the next year?
garth
sir tony-
I don't know. Pastor McConnel said in the previous blog comments that it's possible to make maple syrup in Missouri. You can probably make maple syrup anywhere there is an abundance of maple trees and a cold season.
garth-
Yes, the tap holes heal over with time. You should not tap in the same place again.
I love 100% Maple Syrup. Have you ever thought about selling yours?
Hi citigirl-
Thanks for asking. No I have not considered selling. We make so little of it and, on our scale, it doesn't come easy. So we cherish it and use it ourselved and give some as gifts to family...and maybe trade for sorghum molasses with friends in Missouri.
If I ever get into the bisiness of making maple syrup, I'll certainly make it known here.
Great posting. Your reasons for tapping and making maple syrup are perfect. It's a great family activity and teaches children that nature will provide for us. For those looking for more information on getting started at home, take a look at www.TapMyTrees.com.
altho you choose to eschew plastic, even rink points out that plastic taps are better for the trees. i put in 50 taps within sight of my house. my trees are all ancient and i can put up to three in some trees. i put in plastic taps and ran the hose into a 5 gallon bucket at the bottom of the tree. i cut a hole in the cover of the bucket just big enough to get the hoses in thereby eliminating all dirt, moths, etc. and also i didn't need a collector tank as i could just switch buckets. i made my own cooker out of a 80 gallon cold water tank and bent my own pans and made about 20 gallons and only had to work 15 hours a day to make it happen. we sold most of it and it worked out that i made about 55 cents an hour. so unless you want to go to commercial size cookers that drain themselves, just make it for yourself.
Post a Comment