Dateline: 11 April 2008
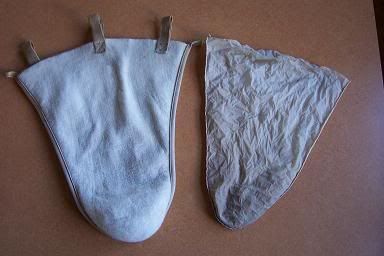
Hot syrup needs to be filtered. We do this outdoors, as we are draining the syrup from the evaporator pan. We use a heavy felt filter that is made for this purpose. The filter is made like a pouch, with a wide, open top. And we use a similarly shaped pre-filter inside the felt. The pre-filter is a thinner material and easier to wash out. Here is a picture of the washed out filters (felt filter on left and pre-filter on right). If washed and dried, both filters will last for many years, though they may become somewhat stained (as is the one on the right in the picture).
To do the filtering we simply hold the two filters open over the stock pot and drain from the evaporator down into and through the filters. The person holding the filter wears gloves because the syrup and steam are extremely hot. A few clothespins are useful for holding the felt and prefilter together around the top.
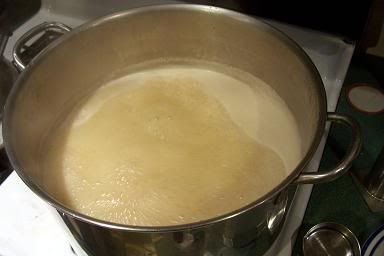
Here’s a picture of the stock pot of suryp boiling on the kitchen stove:
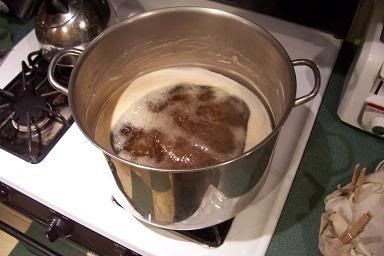
A unique characteristic of boiling maple syrup is that, when it is close to done, a boiling foam of the syrup will rise up in the pan. If you reduce the heat, the foam will subside. A whole pan of frothing sap can also be miraculously sent into instant retreat by simply touching it with some butter. I’ve heard that the old-timers suspended a piece of salt pork over their evaporator pan to halt the sudden rise of maple bubbles. Here is a picture of tiny, hot, frothy, maple bubbles rising in the stock pot:
The trick to finishing maple syrup is knowing when to stop boiling. There is an optimum range for sugar content wherein the syrup is nicely sweet and thick (once it cools), but no sugar crystals form upon cooling.
Rink Mann tells in his book, Backyard Sugarin’, how to gauge this optimum range for sugar content by using a candy thermometer to measure the temperature of the syrup at a boil. When it is seven degrees hotter than boiling water, the syrup is done (see the book for more specific details). We used a candy thermometer the first couple of years that we made syrup. Then we decided to buy a maple syrup hydrometer and test cup.
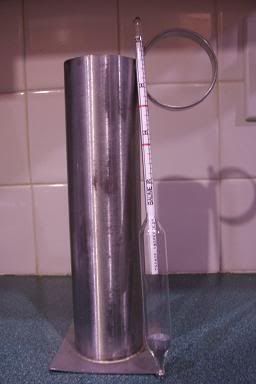
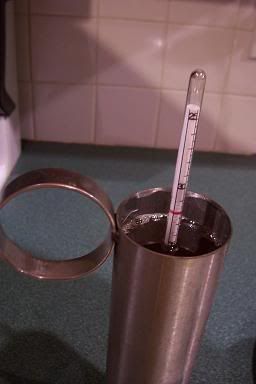
The hydrometer is a sealed glass tube with a weighted bottom. A calibrated strip of paper has been sealed into the tube. To use the hydrometer, you first dip the stainless steel test cup into the boiling syrup to fill it. Then you slowly lower the hydrometer into the liquid. If there is too much water in the syrup, the hydrometer will come to rest on the bottom of the test cup, and stay there. That means more boiling is needed.
But if the hydrometer bobs up and floats, the syrup is ready. The higher the sugar content of the liquid, the higher up the hydrometer floats. There are two red guide lines on the hydrometer scale that indicate the acceptable range for finished syrup. We’ve found that when the hydrometer just starts to float, the syrup is nicely done. I suspect there are slight differences between hydrometers and you need to find the “sweet spot” on your particular instrument.
You can also utilize the hydrometer when boiling sap in the evaporator outside, and we do that. But be prepared to immediately stop the boil and drain the syrup off as soon as the hydrometer shows any indication that it is about to start to float up. You can tell when it’s close to floating by how it acts in the syrup.
Here’s a picture of the hydrometer in the test cup:
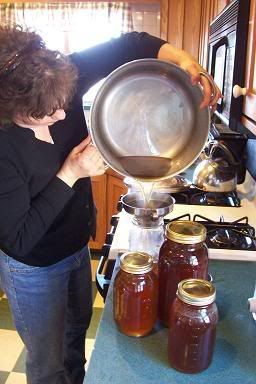
When we’ve determined that the syrup is done, we turn the stove burner down to a simmer—just enough to keep it hot. Then we ladle the syrup into canning jars for storage. Here’s a picture of a quart jar with a funnel and a measuring cup for ladling:
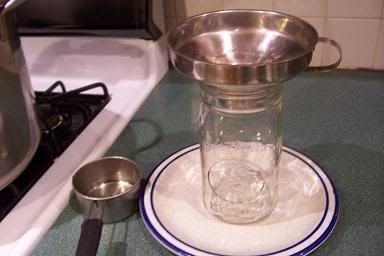
We once bought plastic, quart-size maple syrup jugs to put our syrup in. That was a stupid thing to do. There are plenty of canning jars in our pantry, they don’t cost anything, they are reusable, they are sanitary, and we get to actually see the entire contents of the container (which is kind of nice).
We pre-heat the jars in the oven to prevent thermal shock and possible jar breakage when filling. Then we dip the syrup out of the stock pot and pour it into the canning jar. We fill to about 1/4” below the rim. Put a canning jar lid on, followed by a ring, and tighten it down. Then the hot jar needs to be tipped so the syrup can sterilize the air space. Set the jars upright to cool and they will seal just fine. They will keep for years.
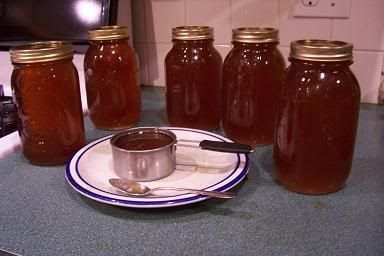
Here’s a picture of the yield from one day’s boil: five quarts and a cup.
As the jars of syrup cool and over time, a thin layer of sediment will settle to the bottom. It is known as “sugar sand” or niter. It is too fine for the felt filter to stop. The niter is no problem with homemade syrup (you just pour out of the jar, leaving the very bottom layer, and it washes right out), but it is probably not acceptable for syrup that is sold to the public. I understand commercial syrup producers have special filtering equipment that will remove the niter.
A tutorial about how my family does Backyard Sugarin’ would not be complete without a picture of The Lovely Marlene, my sugarin’ helpmate. Here she is tending the stock pot of syrup.
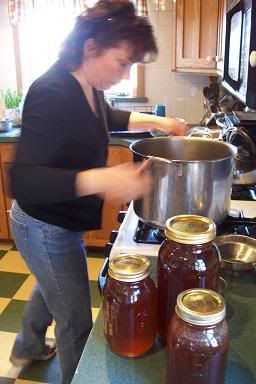
The blurry picture is indicative of how industrious my wife is—it's tough getting her to stop for a still picture. But I did manage to get one...
So there you have it. That’s how my family makes maple syrup on a very small scale, using very basic equipment, in our backyard. It was a productive season. Eight gallons of homemade syrup are in the pantry.
As I write this, it is April 11th. Our last boil was five days ago. Maple season is over for another year. We have pulled the taps. The buckets and other equipment are washed and put away. The maple trees are now budding. Spring is at hand. The garden beckons....
======================
CLICK HERE to go back to Part 1 of this Backyard Sugarin' series |
| CLICK HERE to check out the Wood family's "Sap to Syrup" DVD |


.JPG)
.JPG)


.JPG)

.JPG)


.JPG)


7 comments:
Very good series! I am surprised that you could fit it into only 5 installments though ;-) Must have had a lot of planning go into it.
Around here syrup sell for around $40 a gallon--8 gallons would then be $320. Maybe it's not so bad to take an afternoon off after all, eh?
Dad's sister's husband's mother (I think I got that right!) has a big sugaring operation, someday we would like to go see it, but that hasn't happened yet.... Some friends from church tapped their woods and collected around 1100 gallons of *sap* and then they took it over to our relation's operation to have them boil it down. I think they will do that for half--maybe worth it if you have a lot. But then on the other hand once you've got the setup what's a few (hundred) more gallons?
Great pictures too, they are truly worth a thousand words! Where did you get the hydrometer and test cup? Looks like y'all have a real professional setup.
Thanks for the comment on my blog! Unfortunately, we don't have any juice factories around that we know of...my aunt is working on tracking down a guy that just replaced their water softener (salt?) tank, who can get a bunch of barrels from that type of thing, to see if any of them are the right size. We checked several places around, but they no longer have plastic barrels...or are out of business (wonderful economy around here (not too long ago we were the only state to have the distinction of being in recession)--all the more reason to start down the homesteading road!)
I look forward to the Whizbang projects--I'm sure they'll be a ton of fun.
Matthew
wow. what a great series. I have spent time at two neighbors who have sugar houses this winter. Both have commercial pans but have many home-built devices and techniques as well.
I have several large maples in my yard that neighbors have said are some of the best sugar maples around and i will tap them next winter, and now, because of your series, i have a good idea of how i'm going to boil down the sap.
thanks, eric. gardenfork.tv
Do you replug the taps in the trees to prevent insect damage and help it heal?
Hi Matthew-
Thanks. I think I'm getting more efficient with the serial blogs.
Yes, maple syrup is expensive and I suppose that, in a sense, I saved a lot of money, though I probably would not ever buy eight gallons of syrup in a year. Actually, if you were to figure in the income taxes I'd have to pay on the hours I worked to make the money to buy all that syrup, I'd have saved even more. Probably more like, oh, $500 or so.
Sounds like you have a great opportunity to learn all about making maple syrup!
The equipment (hydrometer, etc.) is available from numerous mail order suppliers. An internet search will turn them up. We got ours from a supplier in our area.
Keep looking and I'm sure a barrel source will turn up. They are out there, free (or cheap) for the taking. Maybe put an inexpensive ad in the local "pennysaver" newspaper. I know someone who put an ad in the paper for used steel roofing, old lumber, and such and they ended up getting all kinds of free stuff from people who were glad to have someone come take it. You never know.
Hi eric-
I'm glad to know my series inspired you. Once you get a taste of your own maple syrup, I think you'll be hooked. It's a great springtime activity.
haymaker-
There is no need to plug the holes. A healthy tree will heal just fine. I think plugging the holes may actually lead to problems.
Great series Herrick! Not sure I'll find lots of maple trees to tap here in SE Texas...but I've 'saved' the information for the future!
Thanks! Your descriptions and pictures are quite helpful. I just tried this for the first time today, with a little 4 gallon test boil. The candy thermometer was useless and I went a little too far. The result is tasty but too thick, more like the consistency of honey. There's plenty of season left so we'll try again soon!
Must say how much I enjoyed your Sugarin series. We plan top tap our few backyard Maples this Spring and make what qty of syrup we can from them.
Great read and pics.
God's blessings,
Fr. Jeff+
Post a Comment