Occultation Covers
In The Garden

Dateline: 17 May 2014

One of my garden beds with an occultation cover. Click the picture to see an enlarged view.

As I explained back in Deliberate Agrarian Snippet #13, I have decided (after a lifetime of resisting the idea) to utilize plastic as a mulch in my garden. I was persuaded to give plastic a try because I do not have the time to run my Planet Whizbang mail-order business and keep my whole garden properly cultivated. Besides that, Jean-Martin Fortier's book, The Market Gardener convinced me that black plastic makes good sense.

Fortier uses the plastic in two ways. First, he uses it to cover his 30" wide beds that are prepared-for-planting….


[W]eeds germinate in the warm, moist conditions created by the tarp but are then killed by the absence of light. This weeding technique, described as "occulation," is widely used by organic growers in Europe.

I've never heard of the word, "occultation" and a Google search of the word "occultation" and "garden" didn't turn up anything. Although the concept is nothing new to most gardeners, I think the word is. Here is what else Jean-Martin Fortier writes…


We have been using 6mm black plastic silage tarps in the garden for almost a decade now, and I can say without hesitation that their usefulness is one of the reasons behind the overall success of our operation. This passive and efficient practice takes care of part of the weeding chores while we are getting work done elsewhere in the garden.

I don't have a 1.5 acre market garden, and don't have a black silage tarp, but I decided to use some 48" wide lengths of This High-Quality Landscape Fabric for occultation covers in my garden, as the picture at the top of the page shows. 

The tire sidewalls, which I have been collecting and using in various ways in my garden for years, do a fine job of holding the plastic in place. After being covered a few weeks, the soil under the covers is weed-free and moist. The tilth of the soil under the covers is dreamy-nice.

After using the plastic for occultation covers, I folded it in half and laid it between the beds, as shown in this next picture…


When a bed is harvested and not growing anything, I will re-cover it with an occultation cover to keep the weeds from developing. That is what Jean-Martin does.

Thus far, I'm liking this landscape fabric. I did, however, find out that it will unravel on the ends if not heat-sealed, as this next picture shows…
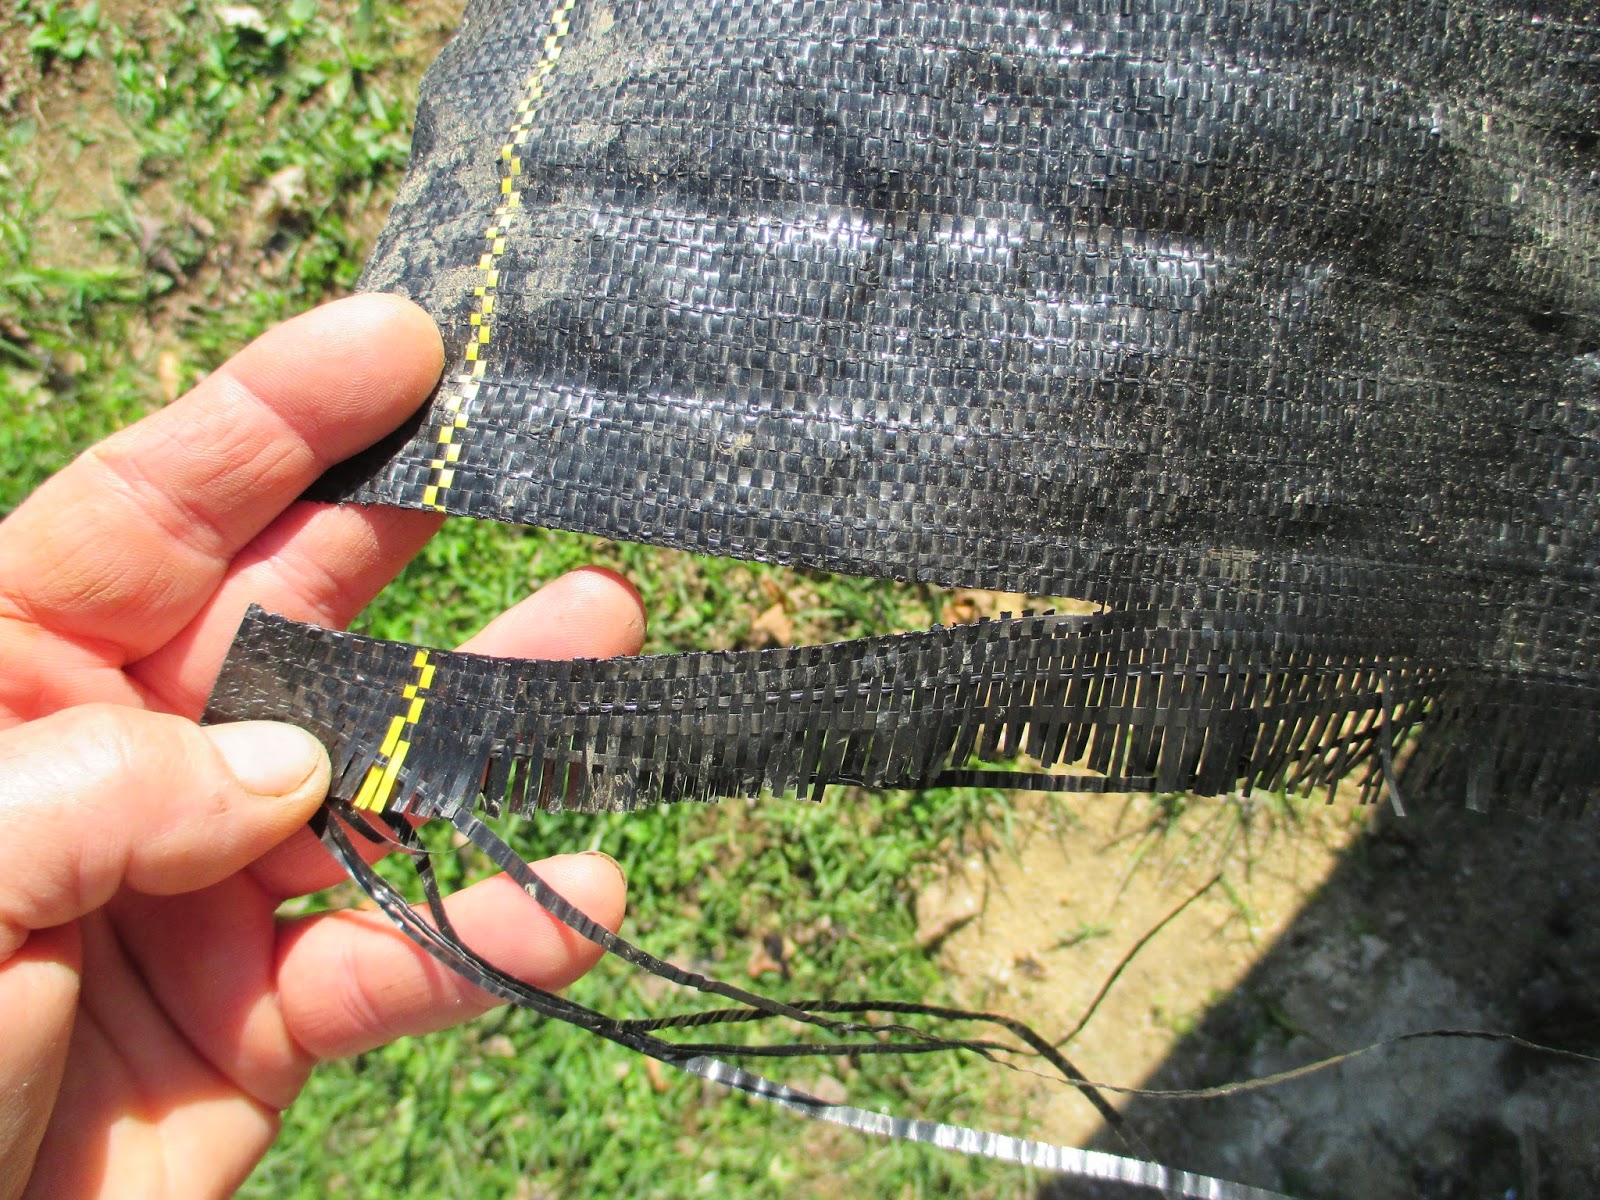

Occultation covers made with landscape fabric will fray on the ends if cut with a knife. I had to re-cut the ends with a hot knife to get a sealed edge. You can also seal the ends with the heat from a propane torch. 

I'm impressed with the durability of the landscape fabric. It remains to be seen if it will last 10 years, as the manufacturer says it will. But the following YouTube clip is evidence of just how strong and long-lasting the product is…


Deliberate Agrarian
Snippet #30

Grape Trellis Fittings

Dateline: 16 May 2014

Grape Trellis T-Connectors, from Planet Whizbang

"I Just wanted to let you know how well your tee post fittings worked on my grape vine trellis. Our soil is really rocky, and digging in end posts and brace posts would have been a real challenge.  So thanks for your cool invention!  It saved me (and my back!) a ton of time and digging." 
—Bob L. (Colorado)

That positive feedback from Bob in Colorado came in a few days ago. The fittings I developed and make here in my home workshop are nothing fancy, but they get the job done remarkably well. If you want to grow grapes, (and every homestead should have some grapes) you need a good trellis structure.  My trellis fittings allow you to make a solid, freestanding grape trellis without a lot of trouble.

Specifications for making your own grape trellis fittings are in my Planet Whizbang Idea Book For Gardeners (page 31 to 33). Or, like Bob, you can simply buy them already made from me. Click Here For Full Details.

P.S.— The fittings can also be utilized to make espalier fruit tree frames.


Some of my past grapes


Deliberate Agrarian
Snippet #29

Joie De Vivre

Dateline: 15 May 2015


Joie De Vivre is a French phrase that means, "exuberant enjoyment of life," or "joy of life." You can learn how to properly pronounce Joie De Vivre at This Link.

Joie De Vivre is a phrase that often comes to mind when I see my grandson. Not a care in the world, he laughs out loud, he talks excitedly, he kisses and hugs others freely, he expresses his emotions fully and without hesitation and, in short, thoroughly enjoys life.

I suppose I was once like that, and so were you. But the realities and responsibilities of life weigh on us as we get older. Though we who are older can be joyful (and I think of myself as a joyful person) our Joie De Vivre can never compare to that of a young child. 

Joie De Vivre is refreshing to see. It makes me happy to see it in my grandson. It is even uplifting to see it in a cartoon…


Deliberate Agrarian
Snippet #28

Planting Elderberry Bushes

Dateline: 14 May 2014

Elderberries
(picture from Nourse Farms)

I had my first taste of elderberry pie after Marlene and I started dating back in 1975. Her mother made elderberry pies each year when the wild elderberries were in season. Since then, Marlene has made plenty of elderberry pies. They are a real treat. Back around 2000 we learned about making herbal tinctures, and we've made elderberry tincture (and elderberry-flower tincture) as medicinal tonics. Someday, I want to make elderberry syrup and elderberry jelly.

With all of that in mind, I decided to plant some elderberry bushes. I could have dug up some wild elderberry but wild elderberry tends to grow large and spread, and it generally grows best in wet areas. Then, this last winter, I read the following description of a new variety of elderberry being sold by Nourse Farms:


Samdal Elderberry: This is one of several newer elderberry varieties from Denmark. Plants are vigorous, producing long shoots from soil level one growing season and bearing fruit the next. These are removed after bearing and replaced by the current year's growth. This makes the plant easy to prune and manage as a bush. Large fruit clusters with good flavor ripen in August each year. Berries have very high anthocyanin content…. Very good for you!

That description sold me because it appears that this elderberry variety can be grown and pruned just like the raspberry canes I've grown for many years. So I ordered four seedlings (pictured below) and wasted no time getting them "bush planted" in one corner of my garden. 

Bush-planting is a simple, sensible, less common technique for planting bramble fruits that was advocated by the famous berry-man, Edward Payson Roe, back in the 1800's. I explain bush planting on page 23 and 24 of my Planet Whizbang Idea Book For Gardeners. And I have labeled the planting stakes with "Forever Plant Tags" as explained on  pages 25 and 26 of the book.

A good supply of water is critically important to growing fruit. With E.P. Roe's bush-planting idea, the bushes can be easily trickle-watered through the season as needed with one of my Planet Whizbang irrigation buckets.


Elderberry plants from Nourse Farms
(click picture for enlarged view)


Deliberate Agrarian
Snippet #27

Transplanting Spinach
(Part 2)

Dateline: 13 May 2014


(click picture to see enlarged view)

In Snippet #26 I introduced you to the idea of starting spinach, chard, kale, Romaine lettuce, and even beets in low-rider tire nursery beds, then transplanting the young seedlings to a garden bed. This snippet explains how I recently planted a bed of spinach starts.

In the picture above I have spaded up a clump of spinach plants (about a month old) from the nursery bed. I soaked the ground thoroughly with water and excavated the clump with lots of soil. The seedlings then need to be separated for planting.


(click picture to see enlarged view)

In the above picture you can see that I've started planting the bed. The bucket of water is used to separate the clump of seedlings. I lower the ball of soil and roots into the water and jiggle it around so the soil dislodges, leaving just plants and lots of fine white roots. Individual seedlings can then be carefully separated from the clump with their roots intact. 

Planting holes are finger-dibbled and a seedling planted in each spot. I usually "puddle plant" according to the 1899 instructions found in My Planet Whizbang Idea Book For Gardeners (Page 60), but the soil was quite moist so I skipped that step.

Violet Purdy Biddle says her puddle planting technique ensures that newly-planted seedlings will not flag (wilt). My experience in the past has been that she is correct, and I should have puddle-planted this bed of spinach. I say that because the whole bed of transplants wilted flat to the ground. 

But by the next morning they had perked up and I was relieved to see it. Here is a picture of the whole bed, taken the day after planting, with 80 spinach seedlings in place.


(click picture to see enlarged view)

The spinach seedlings would, I'm sure, have transplanted with less shock if they were grown in cell flats. But the point here is that they don't have to be. They can be "pinch-sown" into a nursery tire bed and transplanted as I've explained here. One tire bed produced the entire bed of transplants, and the following handful of baby spinach greens.


After planting the bed, I washed those greens, sprinkled some feta cheese over them, and drizzled on a little vinaigrette. It was my first spinach salad of the year, and I'm looking forward to many more, especially when the strawberries are in season.

If you own a copy of my Garden Idea Book, you have access to the hidden web site I've put together for readers of the book (see the last page for how to find the site). There you will find a more complete photo tutorial showing how I start and transplant Romaine lettuce, much like I have explained in this Snippet.


Deliberate Agrarian
Snippet #26

Transplanting Spinach
(Part 1)

Dateline: 12 May 2014

(click picture to see a larger view)

In his book, The Market Gardener, Jean-Martin Fortier writes…


"Given the choice between transplanting a crop and direct seeding it, we always prefer to transplant."

Fortier routinely starts crops like spinach, chard, kale, and lettuce in flats of 72 or 128 cells. He even transplants beets.  One of the advantages of transplanting such crops is…


"The chances of crop success are improved because seeding density is perfect and crops have a head start over weeds."

That makes a lot of sense to me. I have transplanted Romaine lettuce with great success in the past and decided to give spinach, chard, kale, and even beets a try this year.

Instead of starting the plants in flats in a greenhouse, I utilized some "Whizbang low-rider" nursery tire beds with solar pyramids over the top. Both the low-rider tire beds and the solar pyramids are explained in My Whizbang Garden Idea Book.

In the picture above, you can see a row of solar pyramids (positioned over low-rider tire beds) in my early spring garden.  This next picture shows two of the nursery beds about a month after planting.

(click picture to see a larger view)

There are two varieties of Romaine lettuce in the front bed and spinach is in the back bed. The seeds were planted in hills (see page 45 of my idea book).

In Part 2 (Snippet #27) I will show how I transplanted the spinach plants into a garden bed.


Agrarian Snippet #25
Mystery Tool

Dateline: 11 May 2014

click to see an enlarged view


Last month, with sap season behind us, Marlene and I decided to treat ourselves to a day of antique shopping. Wood and tin and iron artifacts from our agrarian past fascinate me. Can anyone identify this handy tool, carved from a piece of wood, with a bit of leather?


Deliberate Agrarian
Snippet #24

ReluctantPreppers

Dateline: 10 May 2014


I've mentioned here in the past that I don't identify myself with the current "prepper" movement. It's not that I'm opposed to people being prepared for disasters. That's just being smart, especially in a modern, industrialized world with so much complexity and interdependency. Disasters in the form of economic, social and/or technological failure (a.k.a., collapse) are going to happen. It's only a matter of time. So I think being prepared is just good sense.

The difference between me and many in the prepper movement is that even if our civilization wasn't in danger of collapse, I would still be endeavoring to live a simple, self-reliant, contra-industrial way of life. I would still be doing this because I believe it is not only a more authentic way of life, but a biblically correct way of life. As I explain in My Book, I believe that God intended for His people to live an agrarian way of life. I'm persuaded that agrarian life best supports the development of stronger, more faithful families. I think God created families to live close to the land and in dependence on Him more than on an industrialized system that strives to supplant Him. 

Furthermore, I believe Christianity lived within the agrarian paradigm, is the ideal incubator of Christian character. Faith, hope, patience, endurance, selflessness, responsibility, and so many  more wholesome character traits come more naturally to those who grow up within agrarian families and communities. True masculinity and noble womanhood are also the natural products of an agrarian culture. 

So I think there is a fundamental ideological disconnect between me and your average modern prepper. However, I realize that the eventual collapse of industrialism has caused many modern Christians to see more clearly the manifold shortcomings of the industrialized way of life, and to then rediscover Christian agrarianism. And that's a good thing.

All of which is a long-winded way of introducing The Reluctant Prepper on YouTube. I was contacted by Dunagun Kaiser about doing an interview (which I declined, thank you). His e-mail led me to check out his YouTube interviews. Dunagun is doing a good job at getting a variety of people's experiences and viewpoints, and encouraging them to be better prepared for what will be coming our way.

Also…. Dunagun's 18-year-old son, Elijah, has an extensive series of interviews at Finance and Liberty on YouTube. Elijah is landing interviews with a lot of big names in the world of "alternative" financial discussion. This Interview with Jim Willie is one example of economic perspective that you surely won't get from the mainstream media. 

I don't endorse any of the economists I've listened to, but I really do enjoy hearing what they have to say, and considering the possibilities they present.


Deliberate Agrarian
Snippet #23

An Agrarian
Form of Education

Dateline: 9 May 2014

Photo Link


"Classical education is an agrarian form of education. Modern education is industrial. The human body is made of the dirt of the ground; we can't know ourselves apart from the garden. It's simpler, more local, more focused on the rhythms and harmonies of nature and the soul. Someday, perhaps, we'll be able to see it again. But in my view, classical education must work dialectically with farming to restore a mind that is bound to reality—and happy to be so bound, like a happy marriage or a successful farm."

—Andrew Kern


Fellow New Yorker, Sarah, D., sent me the above quote. It comes from This Link. I'm not familiar with Circe Institute ("cultivating wisdom & virtue"), and I don't know much about classical education, but I sure do like the quote!


My Family's New
Coast Guard Cutter

Dateline: 8 May 2014

Sumner Increase Kimball
1834—1923

Now the U.S. Coast Guard is naming a new ship after me. Well, sort of. 

National Security Cutter #7, to be christened Coast Guard Cutter Kimball, is actually being named after my ancestor, Sumner Increase, who pretty much founded the Coast Guard. You can read all about Sumner Increase At This Link. And you can read about the new ship at This Link.

How I came to know about this is kind of an amazing story... My half-brother, Christopher, just happens to work down in Alabama for the company that is building the ship. He e-mailed my Aunt Carolyn up in Maine, wondering if we might be related to this famous Kimball. Aunt Carolyn e-mailed 2nd cousin Reginald in Canada who knows the Kimball family history better than anyone. Reginald wrote…

"To answer your query, I checked my Kimball book. Sumner Increase Kimball's descent from Richard Kimball, the immigrant ancestor of 1634, goes like this:  Richard, Richard, Ephraim, Ezra, Richard, Nathaniel, Increase Sumner, the latter man being his father.  Your descent from that same Richard Kimball of 1634 is as follows:  Richard, Richard, John, Richard, Jacob, Asa, Richard, William, Jedidiah, Leverett, Herrick, Carolyn. 

Thus you can see that Sumner Increase Kimball and our William Kimball of N.B. were 5th cousins.  And you are a 5th cousin, 4 times removed, of that same famous Sumner."


I don't know if I'm a 5th cousin 5 times removed, or what. But the point is, Sumner and me is definitely kin. Do you see a resemblance?

Another interesting thing…. Sumner graduated from Bowdoin college in Maine (he started college when he was 16 years old). My grandfather, Dr. Herrick Kimball (who I am named after), and my father were both Bowdoin graduates too. Fact is, I was practically born at Bowdoin. My father was a student there in 1958, the year of my birth. I had some great times at Bowdoin, back in the day (though I don't remember them).

There was a time in my life when I dreamed of being a student at Bowdoin too. When I was in 7th grade I sent a letter to Bowdoin (no e-mail back then) requesting the school catalog. But that idea faded away before I graduated from high school. I wasn't smart enough, or focused enough, or rich enough to go to a school like that. And, in retrospect, it's just as well.

So that's the story of how I got a new ship named after me… sort of.


This is what 497 million tax dollars will buy. 


Deliberate Agrarian
Snippet #22

A Farm Story
—Jerry Apps Documentary—

Dateline: 7 May 2014


My brother-in-law gave me a book titled, "Rural Wisdom," by Jerry Apps. Jerry Apps? That was a familiar name. I got to looking and found that I had blogged about a book by Jerry Apps back in 2009. You can read it at this link: A Chronicle of The Loss of Agrarian Culture.

Further looking turned up Jerry Apps' Web Page, and the documentary movie above. It's titled "A Farm Story," but it could just as easily have been titled "A Chronicle of The Loss of Agrarian Culture." Here's the official description of the movie…

The portrait of a farm boy's childhood in Waushara County [Wisconsin] is told through his personal memories and photos from the community. Apps evokes memories of a time when almost as many Americans lived on farms as in cities, and examines day-to-day rural life. Fieldwork was done with horses, cows were milked by hand, lanterns were the source of light, and community was essential for survival.

This is a documentary well worth watching if you are an agrarian-minded person. Parts I especially liked were his recollection of the rural rite of passage of forking a wagon-load of grain bundles into the thrasher (with his father's approving look), how they planted (and harvested) acres of potatoes, and the introduction of electricity on the farm (when he was a sophomore in high school). A traditional way of life soon came to a close when electricity came to the farm.


Introducing The Portable
Pallet-and-Hoop Greenhouse
(my latest bright idea)

Dateline: 6 May 2014


Don't laugh. This is a better idea than it might first appear. I "invented" this portable pallet greenhouse because I bought some of These Deep Cell Plug Trays, and the trays are too big to fit under my amazing solar pyramids (as I've shown with tomato seedlings in This Past Blog Post). 

The portable pallet greenhouse consists of one pallet (measuring 40" x 48") placed on top of my now-old-and-well-worn (but still perfectly functional) Whizbang Garden Cart. The three hoops that support the plastic cover are 5' lengths of 1/2" pvc water pipe. The cover is 6' wide perforated row cover plastic. Recycled cardboard is nailed down over the bottom of the pallet to keep out bottom drafts. A length of Twine is tied tightly around the perimeter of the hooped enclosure. Clothespins hold the plastic to the twine all around. The interior dimensions of the greenhouse are 32" x 45."

If you have my Planet Whizbang Idea Book For Gardeners, you will recognize this set-up as a variation of Mark Albert's remarkable caterpillar cloche sysyem. 

Being portable I can wheel the greenhouse anywhere I want. When located right outside the door to my house (as the picture above shows it) I can easily transport young seedlings into the greenhouse in the morning for a day of sunlight, and bring them back in the house at night (because early spring nights can be too cold for the young plants).

Being raised up makes it very easy to work in the greenhouse. Simply unclip the plastic on one side and the contents are conveniently accessible at waist height.

Being made of an old pallet, recycled cardboard, twine, and other basic materials means this greenhouse is cheap to make. And it is surprisingly sturdy. It has been buffeted by some strong spring winds and, though the plastic flaps around, all is peaceful inside the structure; the plastic cover holds tight.

Another advantage to a portable pallet greenhouse is that you can make it in a few minutes. This is not a complicated, time consuming project. The following pictures provide more details.


click picture for enlarged view

The end of the pvc hoops slip over a short piece of 1/2" wood dowel. I drilled a 5/8" hole through the top board of the pallet and just enough into the bottom board of the pallet to create a pocket for the end of the dowel. Then I cut it off at 1.5" above the top surface. Slide the pvc pipe over the projecting 1.5."

If you space these dowel pins 32" apart, the 5' length of pvc will bend and fit to make a nice hoop that is 21" high.


The above picture shows how the clothespins clip the plastic to the twine all around the bottom of the hoops. This arrangement is much stronger than you might think. 


The above picture, taken through one of the holes in the plastic cover, provides a peek inside the greenhouse (click the picture to see a larger view).

This little portable greenhouse will hold a lot of plants, and we will make use of it through the season. It amounts to a lot of practical functionality without a lot of fuss and expense. The parts can be reused again next year.

This greenhouse is part of my "off-grid" approach to starting plants for the garden. I never use heat mats, or electric lights. They are not necessary for a family-size garden. Plants can be started on a windowsill. They will get a bit "leggy" on the windowsill, but if you re-pot them into a bigger container after the first leaves have formed, then get them outdoors, under plastic, into full sun, as much as possible after that, they will grow just fine. That has been my experience.