Backyard Sugarin’
Part 5
Finishing

Dateline: 11 April 2008

My previous essay in this series explained how we boil maple tree sap down to syrup in a jerrybuilt, wood-fired evaporator. When the syrup is close to done we stop the boil, drain the evaporator pan into a big stock pot and finish it off on the kitchen stove. The advantage to finishing on the kitchen stove is that we have better control of the heat.

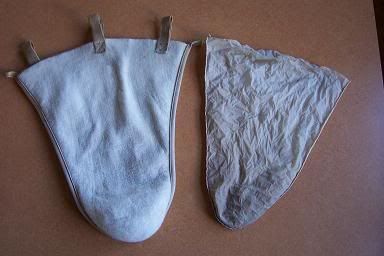
Hot syrup needs to be filtered. We do this outdoors, as we are draining the syrup from the evaporator pan. We use a heavy felt filter that is made for this purpose. The filter is made like a pouch, with a wide, open top. And we use a similarly shaped pre-filter inside the felt. The pre-filter is a thinner material and easier to wash out. Here is a picture of the washed out filters (felt filter on left and pre-filter on right). If washed and dried, both filters will last for many years, though they may become somewhat stained (as is the one on the right in the picture).
Photobucket


To do the filtering we simply hold the two filters open over the stock pot and drain from the evaporator down into and through the filters. The person holding the filter wears gloves because the syrup and steam are extremely hot. A few clothespins are useful for holding the felt and prefilter together around the top.

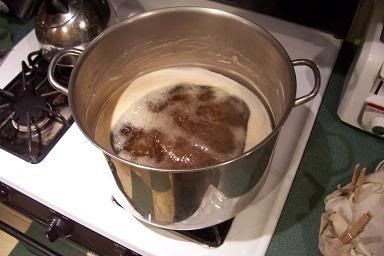
Here’s a picture of the stock pot of suryp boiling on the kitchen stove:
Photobucket


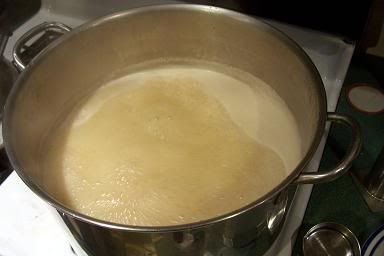
A unique characteristic of boiling maple syrup is that, when it is close to done, a boiling foam of the syrup will rise up in the pan. If you reduce the heat, the foam will subside. A whole pan of frothing sap can also be miraculously sent into instant retreat by simply touching it with some butter. I’ve heard that the old-timers suspended a piece of salt pork over their evaporator pan to halt the sudden rise of maple bubbles. Here is a picture of tiny, hot, frothy, maple bubbles rising in the stock pot:
Photobucket


The trick to finishing maple syrup is knowing when to stop boiling. There is an optimum range for sugar content wherein the syrup is nicely sweet and thick (once it cools), but no sugar crystals form upon cooling.

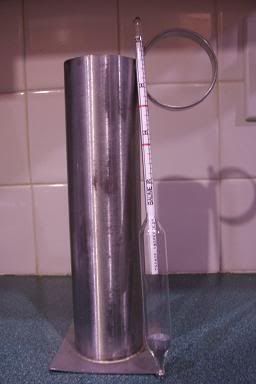
Rink Mann tells in his book, Backyard Sugarin’, how to gauge this optimum range for sugar content by using a candy thermometer to measure the temperature of the syrup at a boil. When it is seven degrees hotter than boiling water, the syrup is done (see the book for more specific details). We used a candy thermometer the first couple of years that we made syrup. Then we decided to buy a maple syrup hydrometer and test cup.
Photobucket


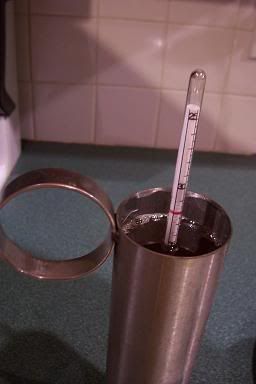
The hydrometer is a sealed glass tube with a weighted bottom. A calibrated strip of paper has been sealed into the tube. To use the hydrometer, you first dip the stainless steel test cup into the boiling syrup to fill it. Then you slowly lower the hydrometer into the liquid. If there is too much water in the syrup, the hydrometer will come to rest on the bottom of the test cup, and stay there. That means more boiling is needed.

But if the hydrometer bobs up and floats, the syrup is ready. The higher the sugar content of the liquid, the higher up the hydrometer floats. There are two red guide lines on the hydrometer scale that indicate the acceptable range for finished syrup. We’ve found that when the hydrometer just starts to float, the syrup is nicely done. I suspect there are slight differences between hydrometers and you need to find the “sweet spot” on your particular instrument.

You can also utilize the hydrometer when boiling sap in the evaporator outside, and we do that. But be prepared to immediately stop the boil and drain the syrup off as soon as the hydrometer shows any indication that it is about to start to float up. You can tell when it’s close to floating by how it acts in the syrup.

Here’s a picture of the hydrometer in the test cup:
Photobucket


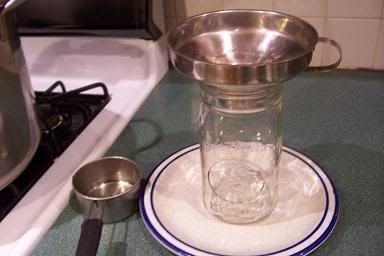
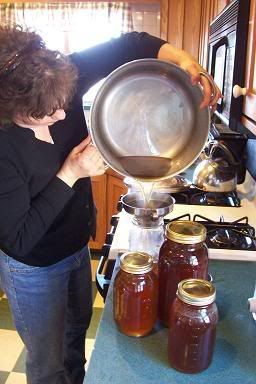
When we’ve determined that the syrup is done, we turn the stove burner down to a simmer—just enough to keep it hot. Then we ladle the syrup into canning jars for storage. Here’s a picture of a quart jar with a funnel and a measuring cup for ladling:
Photobucket


We once bought plastic, quart-size maple syrup jugs to put our syrup in. That was a stupid thing to do. There are plenty of canning jars in our pantry, they don’t cost anything, they are reusable, they are sanitary, and we get to actually see the entire contents of the container (which is kind of nice).

We pre-heat the jars in the oven to prevent thermal shock and possible jar breakage when filling. Then we dip the syrup out of the stock pot and pour it into the canning jar. We fill to about 1/4” below the rim. Put a canning jar lid on, followed by a ring, and tighten it down. Then the hot jar needs to be tipped so the syrup can sterilize the air space. Set the jars upright to cool and they will seal just fine. They will keep for years.

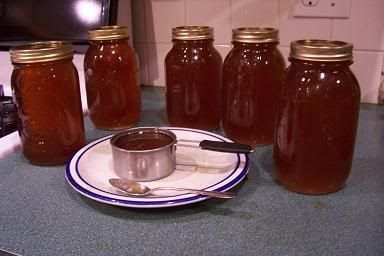
Here’s a picture of the yield from one day’s boil: five quarts and a cup.
Photobucket


As the jars of syrup cool and over time, a thin layer of sediment will settle to the bottom. It is known as “sugar sand” or niter. It is too fine for the felt filter to stop. The niter is no problem with homemade syrup (you just pour out of the jar, leaving the very bottom layer, and it washes right out), but it is probably not acceptable for syrup that is sold to the public. I understand commercial syrup producers have special filtering equipment that will remove the niter.

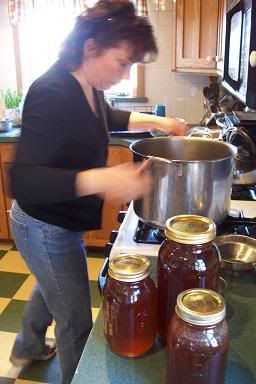
A tutorial about how my family does Backyard Sugarin’ would not be complete without a picture of The Lovely Marlene, my sugarin’ helpmate. Here she is tending the stock pot of syrup.
Photobucket


The blurry picture is indicative of how industrious my wife is—it's tough getting her to stop for a still picture. But I did manage to get one...
Photobucket


So there you have it. That’s how my family makes maple syrup on a very small scale, using very basic equipment, in our backyard. It was a productive season. Eight gallons of homemade syrup are in the pantry.

As I write this, it is April 11th. Our last boil was five days ago. Maple season is over for another year. We have pulled the taps. The buckets and other equipment are washed and put away. The maple trees are now budding. Spring is at hand. The garden beckons....

======================
CLICK HERE to go back to Part 1 of this Backyard Sugarin' series

CLICK HERE to check out the Wood family's "Sap to Syrup" DVD


Backyard Sugarin’
Part 4
Boiling Sap

Dateline: 10 April 2008

As I mentioned in a previous essay of this series, one of the great things about Backyard Sugarin’ is that we utilize inexpensive, homemade, low-tech equipment to make maple syrup. Nowhere is this truer than with the evaporator.

The evaporator is a pan that you put maple sap in and boil off the water. You boil until the sugar content is concentrated to maximum liquid sweetness, and the clear tree sap will turn some shade of maple syrup color.

You can purchase ready-made evaporator pans from maple syrup equipment suppliers. I think they are made of tin with soldered joints. They can be amazingly expensive.

In the book, Backyard Sugarin’ by Rink Mann, he suggests using a big, 18” by 24” “hotel lasagna pan” for an evaporator. Restaurant auctions might be a good source for getting such pans at a reasonable price. He also provides directions for making an evaporator pan out of a 30” by 32” piece of galvanized sheet metal. The sheet can be folded and hammered into shape without any soldering needed.

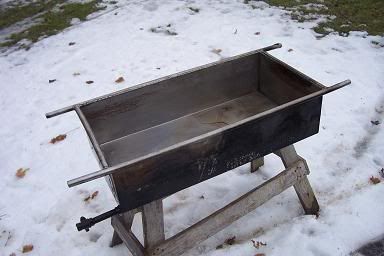
Using galvanized metal for a boiling pan doesn’t appeal to me. I opted to have a friend who is a welder make me a pan. It measures 16-1/2” wide by 33” long by 8” deep. It is made of stainless steel and has a drain on one end. Here is a picture:


Photobucket


The metal in that pan came from a stainless steel plate that was screwed to one side of a swinging door inside a factory. I was doing some remodeling there and salvaged the metal before throwing out the door. I had no use for it at the time but knew it would come in handy someday.

My friend the welder happens to be a Backyard Sugarer too. He fabricated my evaporator pan, added the handles using some salvaged metal he had, welded in a threaded insert for the drain pipe, and charged me 40 bucks for the job.

The pan is pretty much indestructible. On one occasion I boiled too far and ended up with a tough, fired-on black residue in the bottom of the pan. Such an event would have totally ruined a fancy tin-and-solder evaporator pan. But not a stainless steel pan with welded corners. I took an electric disc sander to it and ground off the charred gunk. It took some doing but I did it. In between boiling batches of sap, I clean the pan with water and a sheet of 400-grit wet/dry sandpaper. You can’t beat stainless steel for durability and longevity

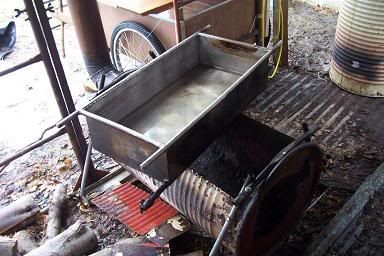
My pan sets on top of, and partly into, a firebox that I fabricated out of an old metal barrel, as shown in the picture below. By the way, in the picture you can see some charred sap inside the pan on the end. It is normal to get some of that after a boil and that's where the wet/dry sandpaper comes in real handy.


Photobucket


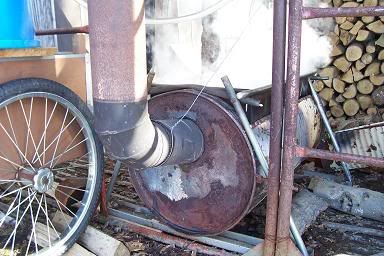
That fire-barrel is actually a new one made this year. The old one (just like it) rusted out after several seasons. My son, Robert made the new one using the old one as a pattern. The stabilizing framework of bolted-together metal conduit was still sound and he reused that. The chimney is 6” diameter stove pipe. It friction fits into a hole in the back of the barrel and is wired up as shown in this next picture:


Photobucket


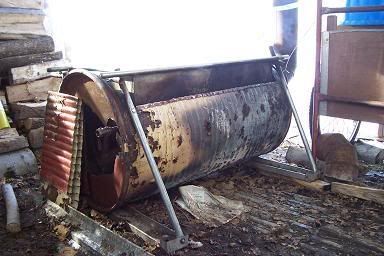
Here’s another view of the evaporator and firebox:


Photobucket


Those scrap pieces of metal in front of the firebox opening are used like a door to restrict airflow into the fire chamber as needed in order to maintain the hottest possible fire.

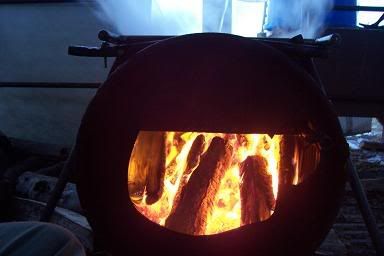
To use the evaporator we fill the pan with sap and build a fire in the firebox. We keep the sap a couple inches below the rim to allow for a rolling boil. It takes some time to get a fire hot enough to boil the pan’s contents. Once it starts to boil, we keep feeding the wood to it all day, and sometimes into the night. Here’s a picture of the firebox in action:


Photobucket


Boiling the sap down is a lot of fun (as long as you don’t boil it too far). The evaporator is located just outside a window in our house, so Marlene (who, with the kids, tends the fire when I’m at work) can periodically look out to see how the boil is going. She enjoys stoking the fire with wood and “babysitting” the boil. There is a very appealing rustic ambiance to Backyard Sugarin’ like this.

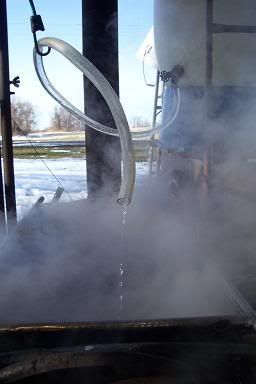
Once the pan gets to boiling, we adjust the valve on the sap barrel to allow a steady trickle of fresh sap into the pan, as shown in this picture:


Photobucket


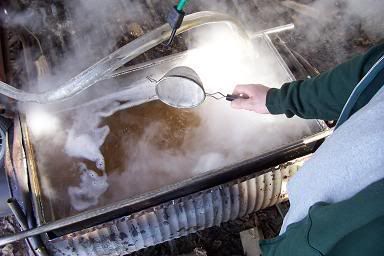
As the sap boils, dirty foam will collect on the surface. We skim it off with a wire mesh strainer, as shown in this next picture:


Photobucket


The sap will bubble and boil down for many hours as we keep the fire fed and fresh sap running in. We can typically boil down a whole barrel in a day. If the sap is “running” and we are refilling the barrel as we boil, we will sometimes leave the full pan with a fire underneath it and go to bed. In the morning the fire will be down to coals and ashes and the sap level will have steamed down two or three inches. Then we re-stoke the fire, top off the pan and boil for another day, or as long as needed to use up our sap supply. But we have never boiled a pan of syrup for more than two days because, the longer it boils, the darker it gets.

As the sap boils off and the sugar content concentrates, the boiling bubbles get smaller and smaller. When the syrup is almost done, the little bubbles will come together in foamy masses over the hottest part of the pan. A wood fire does not offer the control needed to precisely finish the syrup, so we draw it off just before it is completely done, and take it in the house to finish on the kitchen stove.

There is a certain knack to knowing when you’ve boiled far enough. Rink Mann’s book gives some pointers. The more we’ve made maple syrup, the better we’ve gotten at knowing the right time to draw off the evaporator’s contents. We will discuss when the time is right between ourselves: "It's not ready yet!" "Yes it is!" "No it's not!"

The problem is that the syrup can go from close-to-ready to overdone pretty fast. Overdone means that when the syrup cools down, the sugar will crystalize (not the desired outcome). Really overdone means you completely forgot about the evaporator pan long enough for the liquid to all boil off. It's a memorable experience.

There is, fortunately, a simple instrument that you can use to tell exactly when the syrup is close to done and just right. I'll show and tell about that in my next essay.

For our pan, and the amount of sap we process, we usually end up with a half inch of close-to-done syrup in the bottom, and it usually amounts to a couple gallons of liquid.

To draw the syrup off, we have three methods. One is to lift the pan off the firebox, set it over a sawhorse and open the ballvalve to let it flow into a big stockpot. It takes two people to do this and we are extremely careful about it because hot syrup is dangerous. I have a friend who spilled a pan of maple syrup on himself. The burns were bad enough to put him in the hospital and he was out of work for several weeks.

If I am by myself and have to draw off the syrup, I shovel out the hot coals and drain the pan. Or, on a couple of occasions, I’ve shoveled snow into the firebox to quench the fire before drawing off the syrup.

Sorry but I don’t have a picture of drawing off the syrup. But I have pictures of finishing it off on the stove in our kitchen and I will write about that next.

Stay tuned.....

Click Here to go on to Backyard Sugarin' Part 5: Finishing
or
CLICK HERE to go back to Part 1 of this Backyard Sugarin' series


CLICK HERE to check out the Wood family's "Sap to Syrup" DVD


Backyard Sugarin’
Part 3
Collecting Sap

Dateline: 9 April 2008

In the previous essay of this series I showed and explained how my family taps sugar maple trees to collect sap for making maple syrup. Now I’m going to explain how we collect the sap and store it.

It takes approximately 40 gallons of sugar maple tree sap to make a gallon of finished maple syrup. The exact amount varies because sugar content of sap varies. It varies between different trees, and even within the same tree throughout the season.

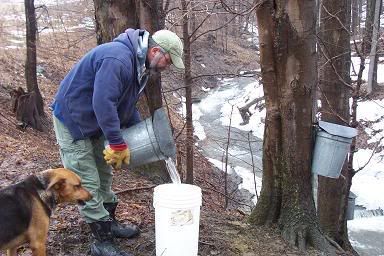
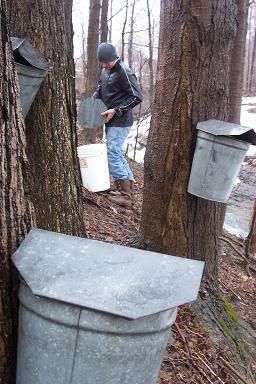
Our “sugar bush” is right out the back door of our house, just across the lawn. With only 25 taps to collect, we simply walk from tree to tree with a couple of five-gallon plastic pails. We unhook the galvanized sap pail from the hook on the sap spile (see previous essay for details) and dump the contents into our collecting buckets. Here’s a picture of me doing just that.


Photobucket


And here’s a picture of my son, Robert, filling a pail.


Photobucket


As you can see, collecting sap is a simple process. But that isn’t to say it is easy. Sap weighs around 8 pounds a gallon. The buckets are heavy to carry. The difficulty of the task is compounded by the steep terrain we have to traverse. Keep in mind too that maple season is also mud and ice season. So collecting sap in buckets and carrying them uphill to our collecting tank is a real workout.

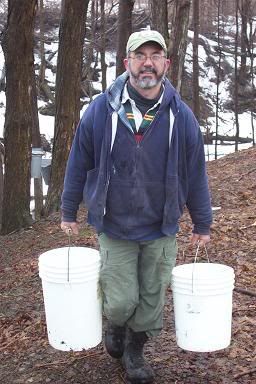
There are days throughout the maple season when the sap doesn’t flow at all, and there are days when it really “runs” (which isn’t to say it is actually running out of the tree like a faucet—it’s just dripping fast and a lot of sap accumulates in the pails). On a good day we will collect sap a couple of times. But usually we collect once in the late afternoon. Here is a picture of me carrying some full buckets.


Photobucket


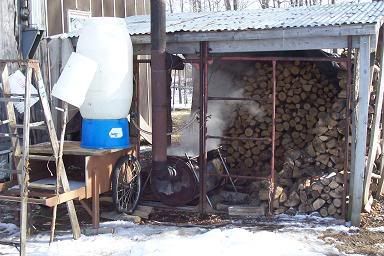
We carry the buckets of sap out of the woods to our makeshift “sugar shack” which is right next to our house, in our wood shed. Before I show you the wood shed and the west side of my house, I need to warn you—this is not a pretty picture. The west side of our house has no siding beyond weathered plywood and some tarpaper. When you are a one-income family and you build your house on a budget, without borrowing money, things like siding can wait....and wait. That’s part of My Christian Agrarian Reality. Here’s the picture:


Photobucket


What you’re looking at is a “temporary” wood shed that has been in place for eight years—far longer than I originally intended. I built it cheap with lumberyard culls and salvaged barn roofing. It does the job. We hand wood through the window in the background and put it in my Yeoman Furniture Wood Box. By the way, CLICK HERE to see the remarkable contrast between the above west side of my house, and the east side.

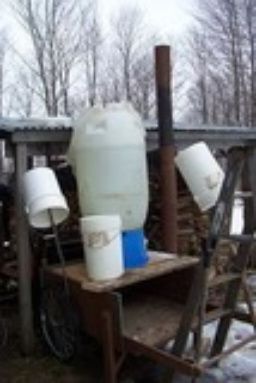
Underneath the woodshed is a steaming evaporator, which I’ll discuss in more detail in the next essay of this series. For now, I’d like to draw your attention to the big white 55-gallon plastic barrel. That is our sap collection tank. Here is another view:


Photobucket


The 55-gallon barrel is up off the ground so we can gravity-feed sap down into the evaporator. Please note that the barrel is up on top of a homemade Whizbang Garden Cart (an essential homestead tool if there ever was one).

You will also notice in the picture that our collecting buckets are upended over upright poles. That is how we store them to keep them off the ground and clean until the next time we need them.

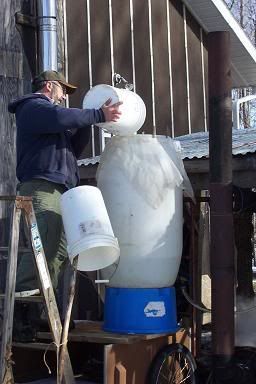
We fill the barrel by dumping buckets of sap into the top, as shown in this next picture.


Photobucket


We don’t use any electric pumps to get the sap up into the barrel. Man and boy power does the job.

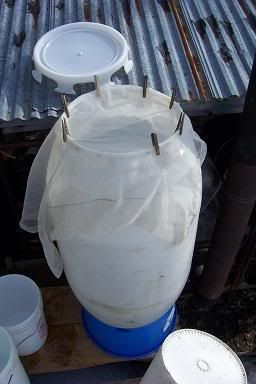
You can see a cloth is over the top of the barrel. That is a piece of sheer nylon curtain material that Marlene bought at a garage sale. It makes a very strong and effective filter and has multiple uses around the homestead. A filter is needed to separate bits of bark and bugs and such from the sap. Here’s another view showing the makeshift filter:


Photobucket


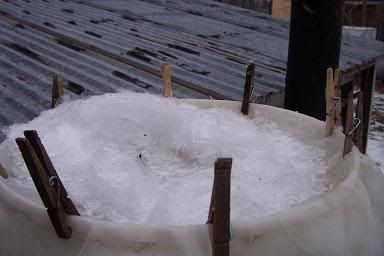
The filter is held in place with clothespins. After dumping our collected sap in the top, I take the clothespins and fabric off and put the lid on. I then clip the material to the roof of the wood shed and let is air dry until next time. In addition to filtering out bugs and bark, the filter will separate any slushy ice that was collected...


Photobucket


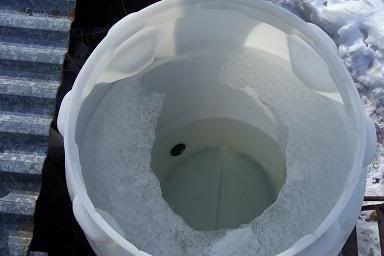
When sap partially freezes, the ice has almost no sugar content. So the ice is thrown away and the remaining sap has a higher concentration of sugar. A little icing is good because it results in less boiling time. Ice can form in the holding tank too, as seen in this next picture.


Photobucket


When the barrel ices up like that, it clogs the outlet drain in the bottom, and we have to dip the sap out of the top to get the boil started. As the evaporator heats up, it will thaw the bottom drain. Icing in the barrel makes more work, but I don’t mind because all that ice is water that doesn’t have to be boiled away. When the barrel is empty, I just tip it upside down and knock out the ice.

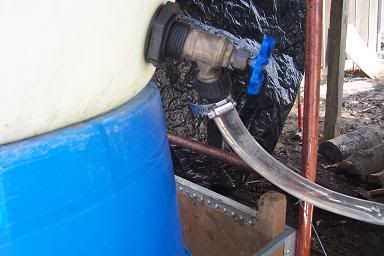
This next picture shows the water valve that I put on the bottom of the sap barrel.


Photobucket


We store sap until we get most of a barrel. If the weather is cold, the sap will keep for several days. In warmer weather it can go bad after a couple days. It is best to keep the collection tank out of the sun so the sap keeps a well as possible.

That’s the story on collecting maple sap.

In my next essay I will discuss our evaporator and how we boil the maple sap down into syrup.

Stay tuned.....

Click here to go on to Backyard Sugarin' Part 4: Boiling Sap
or
CLICK HERE to go back to Part 1 of this Backyard Sugarin' series.


#####
Click Here to check out the Wood family's "Sap to Syrup" DVD


Backyard Sugarin’
Part 2
Tapping Trees

Dateline: 8 April 2008

In Part 1 of this how-to series I explained that my family makes maple syrup on a small scale in our back yard, and I explained our reasons for doing so—reasons beyond just maple syrup. Now I’m going to launch into the details of our particular little operation by telling (and showing) you how we tap trees....

This year we tapped our maple trees on Saturday, March 15. It was foggy and overcast all day but the temperature was in the 40s and the sap was “running.” Cold nights and above freezing days will get the sap flowing.

I was up at daybreak. The rest of my family was still sleeping. Not a problem. I tapped 24 trees by myself and I took my time. Later, I got my son, Robert, to help with the pictures that follow.

Tapping maple trees by oneself on a foggy morning in March is the antithesis of working in a factory in the city, which is what I do five days a week. It was quiet and peaceful in the woods. The air was fresh. I could clearly hear the water rushing through the stream that runs through our woods. But a rushing stream does not make noise; it is a quiet, natural, therapeutic sound. So, yes, I took my time. I savored the experience.

We tap only 25 sugar maple trees because that’s pretty much all the properly sized trees we have available to tap on our small acreage. Our sap storage and boiling operation (as I’ll be showing and explaining later in this series) is sized for that number of taps. If we tapped more trees, we would need to re-engineer our whole small-scale system.

Our woods are directly behind our house, along a gully, and on the west side in an overgrown old family cemetery. So our trees are all within walking distance of our yard.

According to Rink Mann’s book Backyard Sugarin', every tap you put in will translate to about a quart of finished maple syrup per season. we ended up with a better yield than that this year. But it is a good rule-of-thumb.

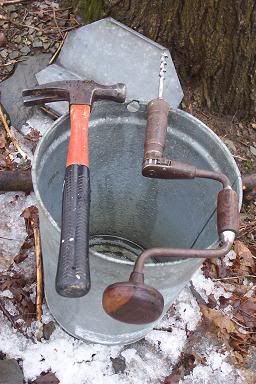
The following picture shows some basic tapping equipment: a galvanized steel sap bucket with a galvanized cover (in the background), a hammer, and hand brace with drill bit.


Photobucket


The first couple of years we made maple syrup we utilized recycled plastic milk jugs to collect the sap, as Rick Mann’s book explains. The jugs are free, and they work fine to collect sap. But they need emptying more frequently than a sap bucket. And if it gets cold, some of the sap will freeze. When this happens in a sap pail, you just take the ice off the top, throw it away, and pour your maple sap into your collecting bucket. But you can’t do that with a partially frozen jug of sap. I’ll tell you why we throw the ice away later in this series.

As you may know, a lot of maple syrup makers now utilize lengths of plastic tubing instead of old fashioned sap buckets to collect sap. They string the tubing from tree to tree and the sap flows along into a central collection tank. We don’t do that because I like sap buckets. They are simple and effective and, if properly cared for, should last a lifetime. Besides that, I hate plastic, or vinyl, or whatever that tubing is made of. The less plastic in my life, the better.

The buckets also clean out nicely. I’ve heard that the tubing is difficult and complicated to clean. We bought the buckets from a local maple equipment place used for something like three dollars each. The covers were a buck more. It was money well spent.

Trees are tapped by drilling a 7/16” hole into the tree with a brace and bit. 7/16” is the universally accepted proper size for a tap hole. And using a hand brace is the traditional method for drilling the hole. You could, of course, use a battery-powered electric drill to drill the holes. That would be faster and easier. But for 25 taps, I keep it simple.

Functional hand braces can be bought at flea markets for a few bucks. Don’t ever buy a brand new hand brace. They are way too expensive. If you need a 7/16” bit for the brace, you can get one at Lehman’s for a few bucks. Properly cared for, both brace and bit will last you the rest of your life and give you no problem. You can’t say that about a battery-powered drill.

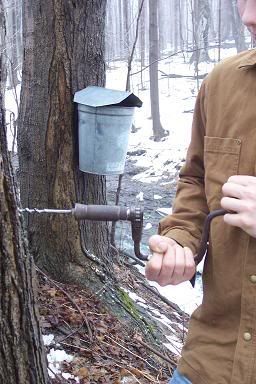
You can tap a tree in 30 seconds with a brace and bit. This next picture shows Robert tapping tree #25.


Photobucket


The tap hole should be drilled a couple inches deep and angled up just a bit. Robert’s drill bit could probably be angled up slightly more than the picture shows. But that's good enough. We drill the holes just above waist height. A little higher or lower makes no difference.

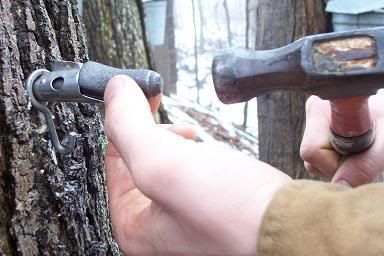
This next picture shows a sap spile with a pail hanging hook and a spile insertion tool, which is used to pound the spile into the hole.


Photobucket


This next picture shows the spile insertion tool in the spile, and the spile being hammered in. The little tool serves to distribute and direct the force of the hammer blows so that the relatively thin metal of the spile is not deformed. A spile insertion tool is not absolutely necessary but it does the job it is designed to do and prolongs the useable lifespan of your spiles. The spile is pounded in until it is snug. Not too tight.


Photobucket


Once the spile is in the tree, the sap will start to drip out, unless the temperature is freezing. I love the sound of sap dripping into the bottom of an empty bucket.

Every maple tree has it's own sap characteristics. Some trees have better sap flow than others, and sugar concentration of sap varies between trees. Seeing as I was in no hurry the morning I tapped, I timed the drips from several trees. Some were producing 40 drips per minute. Most were around 60. My best tree, which also happens to be my biggest, was producing an incredible 120 drips a minute. That tree is always my best sap producer. I call it the “Big Dripper.”

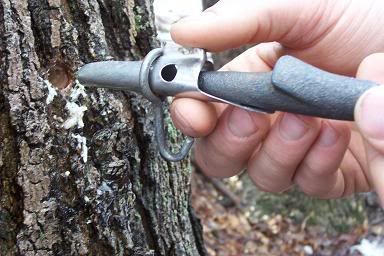
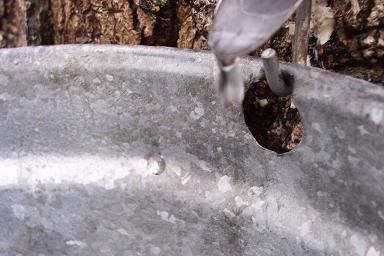
I tried to take a picture of a drip falling off the end of a sap spile. This is the best I could do:


Photobucket


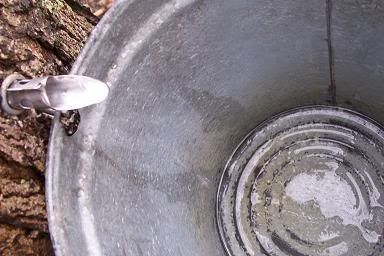
And here’s a drip's-eye view down into an empty bucket


Photobucket


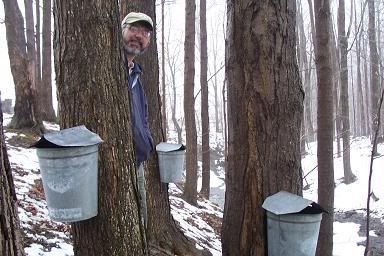
And, finally, Robert took a picture of yours truly amidst a cluster of sap buckets. You can see the steep bank and gully that is behind our house. “Big Dripper” is at the bottom of the gully, which means that collecting sap from that tree is harder than any of the others. In my next essay in this series, I’ll explain (and show) you how we collect and store the maple sap.


Photobucket


To be continued....

CLICK HERE to go on to Backyard Sugarin' Part 3: Collecting Sap
or
CLICK HERE to go back to Part 1 of this Backyard Sugarin' series.


#####
CLICK HERE to check out the Wood Family's "Sap to Syrup" DVD


Backyard Sugarin’
Part 1
Why We Do It

Dateline: 7 April 2008

Yours truly collecting maple sap

Chapter One of my book, "Writings of a Deliberate Agrarian," is titled, The Breakfast of Agrarians (Click here to read chapter One). When you read that short story, you will discover that my family makes our own maple syrup. We do this on a very small scale in our backyard using a relatively simple procedure. Our yearly production of the heavenly-flavored maple sweetness is around five gallons a year. But this year we ended up with a harvest of eight gallons. It was a good year for making "maple."

In this series of essays I will introduce you to the idea of Backyard Sugarin’. Then, in the next four essays, I’ll tell you about how we tap trees, collect sap, boil it down, and finish it off. I’ll also provide lots of pictures along the way.

Some people question why I make maple syrup at all. They see it as a lot of work for a relatively small amount of finished product.

“Wouldn’t it be easier to just buy maple syrup?” That’s the kind of question I get from people who have never done Backyard Sugaring. Folks who have made their own maple syrup don’t ask that question.

And then there is the matter of cost. When my coworkers hear that I’m actually taking a few hours off from work to help make a few gallons of maple syrup, they question the economy of it: “Boy, that’s going to be some expensive maple syrup when you figure your time off into the equation!”

Well, it so happens that making maple syrup with my family isn’t about saving money, and it isn’t about doing what’s easy. It’s all about working together as a family, doing something that is productive and enjoyable, which doesn’t cost much money to do. It’s all about getting outside in the fresh spring air, walking through the woods, feeding a wood fire, and standing over a boiling pan of tree sap, while breathing in the maple steam. In the end, we end up with sweet memories and sweet syrup.

So that’s why we make maple syrup.

People who have done their own Backyard Sugarin’ (even if not as a family tradition) don’t question the economics and work involved. They know there is an intangible something that is very special and downright satisfying about making maple syrup. Rink Mann, in his book, Backyard Sugarin' puts it this way:


”I’ve got to say that there is something magical about sugarin’, and if you talk with people who make maple syrup, either in a big commercial evaporator or out in the backyard, you’ll find out there’s a lot of agreement on that fact.

Maybe it’s the time of year—the warm sun climbing higher into the sky, warming the back after a long winter, turning the snow to piles of white corn, turning the brooks from trickles to torrents, starting the maple sap flowing—a sort of hint of the Spring and Summer lying ahead. Maybe it’s the drip drip of sap falling into the buckets, the telltale aroma of boiling sap, or the hissing sound of sap in a rolling boil. Maybe it’s the magic of converting sweet water, as the Indians used to call it, to delicious golden syrup. But whatever it is, it’s there.


My first experience with making maple syrup came, like so many other first experiences, after high school when I headed off to further my education in Vermont. While there, I spent part of a spring day helping collect sap from buckets hanging on trees, and I spent some time watching the boiling operation in the sugar house. I experienced my first drink of warm maple syrup, right out of the evaporator. One drink, and I was hooked.

It would be a few years before I had land of my own with a few maple trees, and a few more years after that before I finally got around to getting my own sugaring operation going. Part of the delay was that I didn’t really think I had enough trees to justify making syrup, and the sugaring equipment was expensive.

Only after I read the book, Backyard Sugarin’, by Rink Mann did I realize that I didn’t need a lot of trees and I didn’t need all the fancy maple-syrup-making equipment. That book opened my eyes to the whole concept of really-small-scale backyard maple production. It is a very good book that I recommend wholeheartedly. Mr. Mann has this to say of Backyard Sugarin’ in his Introduction:


”The real challenge in backyard sugarin’ is to find ingenious ways to collect and boil down sap without spending any money, and I must say I found a whole breed of like-minded people. Backyard sugarin’ builds interesting friendships, a kind of fraternity, I suppose, born of a mutually parsimonious nature.”

I like to think, too, that most backyard sugarers must have a little of the moonshiner’s blood in them. And there are a surprising number of similarities between boiling maple sap and distilling out the old mountain dew. In both cases you’re separating water from something else. In the case of sugarin’ you want what’s left in the pan after the boiling, while with moonshining it’s what comes off that counts. In both cases, too, you try to set up operations in a nice secluded spot, where you won’t get laughed at for your mechanical eccentricities (in the case of sugarin’) or arrested (in the case of moonshining).


The title of this series of how-to essays is the same as Mr. Mann’s book because his whole philosophy of small-scale, home-scale, on-the-cheap syrup making is summed up nicely in the book’s title; Backyard Sugarin’. His informative little book was the inspiration I needed to make my own maple syrup. Perhaps this series of essays will be the inspiration you need to start making your own maple syrup.

To be continued....
Click Here to go to Backyard Sugarin' (Part 2): Tapping Trees


CLICK HERE to check out the Wood family's "Sap to Syrup" DVD


Peak Grain

I stayed for dinner after church today and, in conversation, the topic of wheat came up. If you didn’t know already, wheat prices have more than doubled from what they were a year ago. My pastor follows the grain market pretty closely. He told me the U.S. grain reserve is gone. There is no reserve. There used to be a surplus reserve of grain in this country. But it’s gone.

If that is true, it is an ominous development.

I decided to look into the subject with a Google search. I discovered a prophetic article written a year and a half ago that talked about the very low reserve of wheat and other grains. The article stated that prices were going to rise. But that will be just the beginning.

It behooves you to read the article. It is not long. It is not difficult to understand. Remember, it was written eighteen months ago. It was written before the price of wheat jumped so dramatically. It was written before your average Joe had a clue any of this was going to happen. Some people can see the handwriting on the wall. We need to take heed. Here is a link to the article:

Grain Drain: Get Ready For Peak Grain

And here is another similar article, written at the same time:

How Long Can The World Feed Itself?

Of Small Houses & Cheap Alternative Housing Options

A friend of mine recently told me that in his town the building code does not allow anyone to build a home that is less than 900 square feet. That got me to thinking about how I really hate it when the government makes such stupid and oppressive laws—especially local governments in areas that are mostly rural.

When Marlene and I built our house—the one we live in now—back in 1985 it measured 16 feet by 24 feet with two floors (no basement). That amounts to 768 square feet. We have since added on to the house so it now amounts to 1,650 square feet. The house is still relatively small, especially with three boys (all in one bedroom). We would love a larger house someday, but what we have is sufficient. Our house is a home. We are content and thankful for what we have.

I can tell you that small houses have their advantages. For one thing, they are cheaper to build. As I explain in my book, Writings of a Deliberate Agrarian, Marlene and I borrowed $10,000 from her father to build our house, and we did the work ourselves. The house is not fancy but it is built very well. There was never a bank loan and the house is now paid for. I’m thankful for that too.

Another advantage to a small house is that it costs comparatively less to heat in the winter, as I have mentioned here a few times in the past. Maintenance costs are also comparatively less. After 23 years, I’m going to need a new roof on the original structure and it won’t break the bank to get that done. Of course, it helps that I’ll be doing the actual roofing work myself.

Looking back, if I had it to do all over again, and I had the same limited financial resources, I’d build a small house just like I did. Perhaps I would incorporate more salvaged materials. I did that with some windows and a staircase, but could have done it to a greater degree. I have an uncle in Ohio who built his house and several outbuildings using almost all salvaged materials, including a slate roof. His house has been featured in Fine Homebuilding magazine.

Or maybe, in retrospect, I would do it just a little bit differently. I now think it would have been wiser to find a good section of land and buy that first. Forty acres would have been nice, with some woods, and some field. The one and a half acres I bought back then, and live on now, is hardly big enough to hold us with all of our homestead projects. What's funny though is that I've gotten e-mails from people who lament that they have only 8 or 10 acres to homestead on.

In any event, with my 40 acres in place, I would have lived in some sort of “alternative” housing to start, while saving to build a more permanent and conventional house. The best alternative housing would be low-cost and not incur any additional property taxes.

One such form of alternative housing would be some sort of camper/trailer. I’ve heard old pull-behind campers can be had surprisingly cheap. And I know people who have lived in them, on their land, for a long time.

Another option is a yurt which is the traditional home of Mongolian herdsmen. I once watched a very unusual documentary movie titled The Story of The Weeping Camel. The best part of the film was seeing the yurt the the Gobi desert herding family lived in. It was roomy and strong and warm in the cold weather. Since yurts are portable structures, I don’t think they would be taxable.

I have long had a hankering to live in a yurt. In fact, I have this idea that someday, when/if I can finally afford to buy a section of woods and field, I will talk The Lovely Marlene into living on our land in a yurt. I have not told her about this yet. She is less adventurous than I when it comes to things like this. Such ideas of mine must be presented with care and wisdom on my part. Hopefully, I’ll be able to persuade her of the many advantages of yurt living and she will agree to try it for one year. And then maybe she would want to live in our yurt for one more year. I don't know which will be harder...saving to purchase the land (debt free) or getting Marlene to try yurt living. Well, one step at a time. :-]

Another possible alternative for housing could be a big, walled tent, like is used on African expeditions. If you think tent living would not be comfortable, check out the pictures at Mary Jane’s Farm Bed & Breakfast. I have written about Mary Jane's Farm HERE. The tent idea would not be much fun in the winter where there is cold and snow. But it would work comfortably for half a year here in upstate New York.

Have you ever been inside a common box trailer that truckers use to haul goods all over the countryside? There is a surprising amount of room in one of those things. I think they measure around 8 foot wide and are something like 60 foot long. Evidentally, the undercarriage wears out and will not pass inspection. Find such a trailer box, with wheels, buy it cheap, park it on your land, and you can set up house in that thing.

My pastor once told me of a nifty tax-free housing idea he had. If your land has a pond on it, build a small floating house on top of empty 55-gallon drums. It would be a house “boat.” The tax assessor around here doesn’t raise your property taxes if you park a boat on your property.

I once knew an old Italian fellow who told me of how, as a young man, he had plans to build a small home for his family out of the lumber in used packing crates. He got the crates free from the factory where he worked. Every day, on his way home (to an apartment) he dropped the crates off at the little section of land he had bought. On weekends, he would take the crates apart and neatly stack the wood under cover. Then World War II came and he went into the military. His plans were put on hold. When he came home from the war, his life had changed course. He never built the house. And he regretted it.

I have a friend who got married last year. He and his wife have been renting a house, and paying utilities. He is very discouraged because it costs so much (especially for fuel through the winter) and they can’t save any money. I could suggest to him that they live in a nice wall tent or a cheap camper for the summer months. Then they could save a lot of money. But I know my idea would not be well thought of.

With the economy the way it is, and people loosing their homes, they need places to live. Most are probably moving into apartments. Marlene and I lived in a two-room apartment for a couple of years when we were first married. I’ll take a wall tent, or an old camper, or even the back of an old tractor trailer box, on a little piece of rural land, over an apartment in town any day, thank you. But a yurt would be preferable.

There are ways to live cheaply, especially in rural areas, where you can get away with “camping out” when you are just starting out, or even starting out all over again. But to live so cheaply requires that you take a socioeconomic step (or two) down from the typical modern lifestyle. It’s a humbling situation that few people are willing to place themselves in. But I think it is easier to do if you see it as a means to an end, not necessarily an end in itself.

Whatever the case, even a shack in the woods can be a beloved home, especially if it is inhabited by a family that loves each other and is thankful to God for the blessings they have. That is what I believe.

=================================
I’m wondering... do you have an example from your own experience of living in some form of cheap, alternative housing (under 900 square feet)? Or do you know of others who have done this. If so, I invite you to tell about it here.

Some Random Thoughts For April 2008

I have a lot of little things on my mind that I’d like to share with you.....

Scott’s Emulsion
As a follow-up to my last blog essay I’d like to tell you about Scott Nearing’s “Emulsion,” which can be found in the book, “Simple Food For The Good Life,” by Helen nearing.
SCOTT’S EMULSION

1 tablespoon honey
2 tablespoons peanut butter

Stir vigorously together into a smooth emulsion in your own bowl. (This is where the guest and eater has to do the work, not the cook.) Then fill your bowl with wheat berries (or kasha or millet). Again give all a good old stir and consume unlimited quantities.


An Organic Apple
For what it’s worth, I bought one organic “Gala” apple at the grocery store one morning this week before going to work. It cost me $1.25.

2008 Whizbang Garden Cart Contest Entry #1
80-year-old John Hudson down in Alabama made himself a Whizbang Garden Cart. It’s a sharp looking unit. Check it out HERE

A Simple, Sustainable Fuel Source
The most recent issue of Small Farm Today magazine has an editorial by publisher, Ron Macher, in which he states:
“One acre of mature forest will supply one cord of firewood per year (cull trees), and the supply will never run out. It is renewable and sustainable.”
As I’ve mentioned in this blog before, I heat my house each winter with a basic woodstove and 10 face cords of wood (which I bought from my neighbor for $450 last fall). I’ve heated my home with with wood in that same stove for 23 years.

In my dreams....someday....I hope and pray I will have a woodlot of my own to husband and harvest sustainably.

Deliberate Agrarian Review
My thanks to Small Farm Today magazine for reviewing my book, Writings of a Deliberative Agrarian. This is what the review says:
”This is a story of the best of rural life as it once was—and as it can be again. It is a wholesome Christian book for those families who want to experience life at its best. I found it an excellent read... It belongs on your bookshelf.”


2.2 Million Less Tomato Plants
According to an article in “Lancaster Farming” newspaper,
“The Mid-Atlantic region’s largest producer of mature green tomatoes is getting out of the business and switching tomato acreage to field corn.”
The reason for the change is the shrinking migrant work force. According to the farmer,
”Let me tell you, there is no local labor that is going to go out and harvest those tomatoes in 90-degree temperatures except our immigrant labor.”
The article reports that it has been years since the former tomato farmer (he planted 2.2 million tomato plants last year) “...has seen local students visit his farm for work. The farm pays a high wage, about $16.59 per hour...”

McDonald’s French Fry Grease
Marlene and I recently attended a wedding reception and sat next to a woman who manages a McDonalds. I asked her how often they change the oil used to make the French fries. The answer.... every 21 days.

That’s THREE WEEKS!

One of my best friends from high school died of colon cancer at 44 years of age. He loved McDonald’s French fries. In high school, when we went out to eat at McDonald’s, he always ordered two large fries with his burger. When he was diagnosed with cancer, awaiting surgery in the hospital, I went to visit him. We had lost touch over the years. I asked if he still ate a lot of McDonald’s French fries. He said he did. He loved McDonalds French fries.

I never eat McDonald’s French fries.

My first Vegetarian Friend
After High School I went to school in Vermont for a year. There I met a fellow named Randall Blank from Philadelphia. We became pretty good friends. Randall was a vegetarian. The only vegetarian I had ever known of before Randall was the guy who ran a natural foods store I sometimes went to. He was pale and frail and sickly looking. But Randall was robust and healthy.

The amazing thing about my friend Randall was that he had never eaten meat in his life. His parents had raised him and his brother from the beginning as vegetarians. He also would not eat milk or eggs or cheese. He wouldn’t even eat jello. For breakfast he poured orange juice on a bowl of Cheerios. We went to McDonalds once with a group of other students. He ate French fries.

Incidentally, Randall and his brother once hitch-hiked to Maine to visit Scott & Helen Nearing.

Randall’s Legacy to Me
One day, my friend Randall, the vegetarian, stopped by the little library in the town where our school was, and they were throwing out 30 years worth of old Organic Gardening & Farming magazine. He brought them back to his dorm room and called me over to see his find.

I happened to love that magazine, and I practically salivated over the sight of so many old issues, going back to the 1940s. I offered him money. He wasn’t interested. I offered him more money. He wasn’t interested. I asked him if there was anything I could trade him for those magazines. There was nothing. So that’s the way it was.

But, near the end of the year, Randall gave me all the back issues. No charge. It was a gift. I was so grateful. I still have all those great old issues. That magazine is now nothing like it once was. It was a wonderful publication in its day.

Thank you again, Randall!

No More Squash
I wrote awhile back about My Squash Planting Secret. That essay got a lot of attention. Sad to say, we ate our last two Sweet Dumpling squashes on March 29th. They were tasty.

So we were able to eat our own homegrown squash for five months after they were harvested. Squash is easy to grow. Squash is easy to store. Squash is nutritious. Squash is good.

Men Talking
Yesterday, as I was going into my workplace, I stood with several other men in a secure enclosure. A heavy steel door automatically closed and locked behind us. We waited, without talking, for a man inside a room with bulletproof glass to work the controls that would open the door before us. We were about to walk into the main yard of a maximum security state prison. Here is the conversation that took place:

Man #1: “Well, here we are again.”

(momentary silence)

Man #2: “Another day in paradise.”

(momentary silence)

Man #3: “Another day closer to retirement.”

Man #4: “Another day closer to death.”

Everyone laughs.

Except me.

And the door opens.

Advice From Jack
I grew up watching Jack LaLanne on television. He inspired me to do exercises with common household items like a chair, a broom, and a couple cans of beans. He had a white dog named Happy. Jack LaLanne was an inspiration to me.

I recently told my kids about Jack LaLanne. He is still alive. He is in his 90s. He is still healthy. We went to his web site.

In 1956, at age 42, Jack set a world record of 1,033 pushups in 23 minutes on “You Asked for It, a TV Show with Art Baker. In 1979, at age 65, Jack towed 65 boats filled with 6,500-pounds of Lousiana Pacific wood pulp while handcuffed and shackled in Lake Ashinoko, near Tokyo, Japan. He did all kinds of stuff like that.

As you might guess, Jack was and is a "health food" advocate. Guess what he ate a lot of. Yep, that's right... Scott Nearing's Horse Chow!

Naw. I'm kidding. You knew I was kidding, didn't you? Well, actually Jack might have eaten Horse Chow. I really don't know. In any event, I want to tell you one of Jack LaLanne's famous Words of Wisdom:
"If it tastes good, spit it out.
Now that's funny. Here's another classic bit of advice from Jack. This is his "Posture Improver" (and it works):
Pretend to try and crack a walnut between your buttocks


It's past my bed time..........


Scott Nearing's
"Horse Chow"
(Part 4...The Conclusion)

Dateline: 1 April 2008

Scott in his later years.

I have been writing about Scott and Helen Nearing, authors of the 1954 classic, Living The Good Life. Though the Nearings and I part company when it comes to fundamental religious beliefs, we share common understandings about the foolishness, failures, and dangers of our modern, industrialized culture.

One of those areas of understanding revolves around the subject of food. The Nearings believed that most modern foods were unhealthy and unnecessary for living the “good” life. In fact, to the Nearings, living the good life meant escaping the modern bondage to the high-priced, chemical-laden, and adulterated foods of the industrial cornucopia.

Helen and Scott embarked upon a pre-industrial diet consisting of fresh fruits and vegetables, most of which were grown in their own garden. They also ate whole grains, nuts, and beans. For sweeters, they used honey, molasses, and maple syrup—never white sugar. They drank water and homemade herbal teas—never alcoholic, carbonated, or caffeinated beverages.

I should also point out that the Nearings were vegetarians, which isn’t necessarily pre-industrial. But I think it is safe to say that most pre and non-industrialized cultures did not and do not eat a lot of meat. Personally, I like meat, and have no problem eating it. But I am not a big meat eater and I now limit my intake primarily to meat I’ve grown and processed myself (chicken and turkey) and meat that has been raised by people I know and trust.

During their 20-year odyssey in Vermont’s Green Mountains, the Nearings report that they had no refrigerator or freezer. They relied on a root cellar to keep produce through the cold months. They also had an unheated greenhouse to grow some greens through the winter. They canned some foods (applesauce in particular). Their “Good Life” book goes into more specific details about their diet. The thing I want to point out is that they ate basic, unprocessed, and usually organic, food.

It was this diet, along with the steady exercise of homestead work, and stress-free living, that is the most likely reason why Helen and Scott enjoyed such long, productive, and disease-free lives. I find that the most inspiring aspect of the Nearing’s example. And, as I recently reread their book, I felt convicted to give more attention to eating more wholesome foods.

Compared to many, my diet is already pretty basic and healthy. As already noted, my intake of meat is under control. I do not eat a lot of processed or sugar-laden food. I haven’t drank a whole glass of carbonated beverage in years (a sip is enough to remind me why). I’ve never been an alcohol drinker (though I have been known to indulge in a rare glass of hard cider). I can do without coffee. I can pass up doughnuts and pastries. Candy does not beckon me (I do, however, have a weakness for peanut butter cups). Nevertheless, I know I can do better about eating foods that are better for me. Thus, I find myself drawn to the whole idea of a Spartan diet.

And so it was that I recently came to read Helen Nearing’s 1980 book Simple Food For The Good Life. I checked it out from the library because I’m trying to cut down on book buying. But I might go buy a copy because I like the book.

Helen’s book is something like a cook book, but she is the first to admit that she didn’t like to cook. She felt she had better things to do than slave over the stove for hours baking and making meals that would get eaten in ten minutes. My wife, Marlene, can relate to that. So the “recipes” in the book are more down-to-earth and simple than probably any other recipe book you've ever seen.

My primary objective in getting the book was to find out about Scott Nearing’s Horse Chow. I had read somewhere that “horse chow” was a favorite food of the Nearings. I wanted to know more.

Well, horse chow is the second recipe in the book (right after popcorn, which the Nearingss purchased wholesale in 50-pound bags). Here is what the book says:


HORSE CHOW

In the early 1930s, before health foods and granola became household words, I made up a dish we called Horse Chow. At that time raw oats were not being eaten by humans. This is the simplest granola of all and perhaps one of the earliest. It was dreamed up in the Austrian Tyrol, where we holed up one winter in a village far from supplies and with a very slim larder of hit-or-miss articles, but with great appetites.

4 cups rolled oats (old-fashioned, not the quick-cook kind)
1/2 cup raisins
Juice of 1 lemon
Dash of sea salt
Olive oil or vegetable oil to moisten

Mix all together. We eat it in wooden bowls with wooden spoons.


After reading that recipe for Horse Chow I decided to give it a try. Cooking is not one of my strengths, but no cooking is needed. Just mixing. I know how to mix stuff. I have mixed concrete in a wheelbarrow many times.

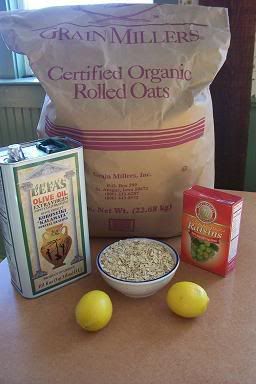
When I made my own Horse Chow, I didn’t follow the Nearing's directions exactly because I’m a typical man in that regard. I now realize (after typing out the recipe above) that I left out the sea salt. It still mixed together just fine. Here is a picture of the ingredients:


Photobucket


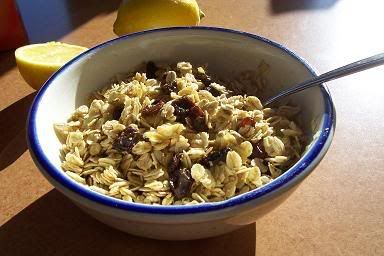
I made my horse chow by putting some raw rolled oats in a bowl. Then I squeezed in 1/2 of a lemon, and mixed. Then I poured in some good-quality olive oil, and mixed. Then I added the raisins, and mixed. Here’s a close-up picture of the finished chow:


Photobucket


You’re probably wondering how it tasted. Well, it needed salt. Just kidding. The Horse Chow was different. It was chewy. But it wasn’t bad. The sweet raisins and the tart lemon made for a nice contrast of flavor. One thing is for sure—Horse Chow fills you up!

I have been eating quite a bit of Horse Chow over the past 10 days. One Saturday I ate nothing but Horse Chow for the whole day. I’ve mixed Horse Chow at work for lunch. I’ve found that I like it better with some apple pieces. It’s also good mixed with yogurt.

You’re probably also wondering how I feel after eating so much of this raw chow. Well, I feel pretty good. I think I’ve even lost some weight since I’ve started eating horse chow. I also run faster and jump higher.

In the past, when I was hungry, I’d snack on bread or crackers (carbs) with something on them (peanut butter, jam, cheese, sardines—you name it). But now I mix up some horse chow. It’s quick and easy.

Did you notice that BIG bag of rolled oats in the above picture? I’ll be eating horse chow for a long time to come. If you stop by for a visit some day, I may feed you horse chow. That’s one of the things the Nearings fed their many visitors.

In my next essays (a twelve-part series!) I will tell you all about recipe number four in Helen’s cook book.....”Scott’s Emulsion”. It’s a two-ingredient recipe. And “Scott’s Emulsion” is really tasty when mixed with boiled wheat berries. ;-)


==================================
CLICK HERE to go to Part 1 of this "Horse Chow" series.